What I Really Eat: Cowboy Chicken

"What I really eat" are my Iron Chef meals. My pantry meals. Shit, my fridge is empty meals. The things that come out of necessity and lack of time. The ingredient list will usually be small and the execution usually simple. Something that is less of a recipe and more of a guideline. If something exceptionally awesome comes out of my Sunday night scramble, it will get posted as a “What I Really Eat” and probably be accompanied with a not-my-best photo.

This is really just roast chicken on top of potatoes and onions. Is this a tale as old as time? Probably. Am I teaching you new things? Probably not.

But this is what this series is all about. It’s not all brown butter and fancy frosting tips in the sizzle & sass kitchen. Sometimes you just gotta eat. And that sometimes is usually a Sunday night at 9pm after a day of burning frittatas, dropping coffee cakes on the floor, and then probably burning something else.

I call this cowboy chicken, because the general idea of it came from a roommate whose many wild woodsman ways reminded me vaguely of a cowboy. A cowboy, not of the southern variety, but of the midwestern -- the Montana type. His version used skin on, bone in chicken thighs with a pat of butter and a garlic clove tucked neatly underneath the skin of each. He placed the thighs on top of roughly chunked potatoes and onions and sent them into the oven to seduce each other into fatty mouthwatering bliss.

The result: crispy garlic laced chicken skin on top of juicy thigh meat, with softly cooked potatoes and caramelized onions coated lovingly in chicken fat beneath.

oh.my.god.

I fussed my version up a bit, unneedingly. I made a compound butter of parsley and garlic paste and smothered an entire bird with the stuff. I sliced my onions instead of chunking them as I do the potatoes.

The same carnal reaction happens in the oven though.The fat and juice from the bird drips onto the potatoes and onions as it roasts and just...oh….

This can be done with any part of the bird, though I highly suggest that it’s with skin on, bone in pieces of meat. Whole legs would be great. I’ve done it with rib in breasts.

The lovely part about this meal is that it is also a “set it and forget it” kinda dinner. You gotta let the chicken just do it’s thang, and that’s usually for the better part of an hour. But then here’s where you get inspired by the ever-genius Michael Ruhlman. See article: here.

I’ll just leave you with that to ponder.


Cowboy Chicken

Inspired by my good friend, Erik

Ingredients:

1 large onion, sliced

1 pound yukon gold potatoes, cut into 1 inch chunks

1 whole roasting chicken (or any other skin on, bone in chicken parts), rinsed and patted dry

3 tablespoons butter

2 cloves garlic

1 tablespoon fresh parsley, finely chopped

salt and pepper

Directions:

Heat oven to 400 degrees.

In a large baking dish or roasting pan layer the onions and potatoes evenly, season with salt and pepper. Place rinsed, dried chicken on top of the potatoes and onions.

Take two cloves of garlic and mince them as finely as possible. Sprinkle with a touch of kosher salt, and then drag the edge of the knife across the minced garlic and sort of flatten it out. Do this several times until the minced garlic has become a paste. (Here is a video displaying what I’m describing. Start at about 1:45)

Take your garlic paste, parsley and butter and mix together in a small bowl until evenly combined.

Spread this compound butter all over the chicken’s skin. Really massage it in there.

Season the bird liberally with salt and pepper, including the inside!

Throw into oven for about an hour or so. It should be uniformly golden and the juices should run clear when you make a small cut between the leg and the thigh.

Let chicken rest about 15 minutes before serving.

*** Two Quick Notes ***

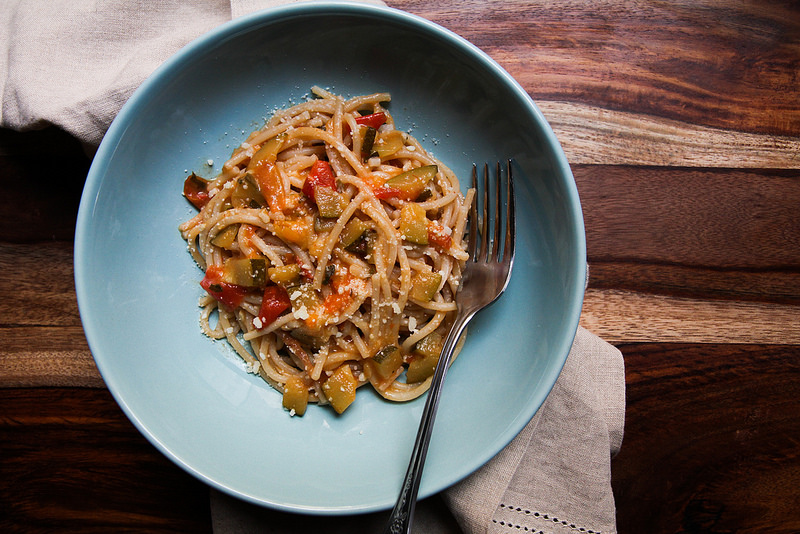
1. The potatoes and onions will probably last a bit longer after the chicken has been picked over. I used mine as a base for eggs for days after. And almost had some left to swirl into some leftover spaghetti squash, but then I might've just eaten it with my fingers cold from the fridge.

2. Use that chicken carcass!!! Make bone broth/chicken stock. Place whatever is left over into a pot with some scraggly vegetables and some other aromatics and simmer away for a few hours. I got about 4 cups of bone broth out of the deal. Straight to the freezer it went to be used in any and everything that calls for stock! 

Stuffed Chicken with Grapes & Olives

An ever obsessing fangirl of Deb Perelman at Smitten Kitchen, this recipe was inspired by her recent posting of roasted grape and olive toasts.

While I am in a lifetime love relationship with toast, I do try to limit my gluten/carb/flour intake on a daily basis. So I wanted to see how I could translate this dish into one without toast. I needed a vehicle for the ricotta, but it had to be something that wouldn’t outshine the grapes and olives.

Then I was reminded about my other stuffed chicken recipe, which this is very reminiscent of. I could totally stuff the chicken with the ricotta and those roasty grapes and olives would make that bland ‘ole chicken breast pop! I added some paprika on top for color and done.

Salty and sweet, and just a touch of heat from the ricotta mix. Sound familiar? Do you know my favorite flavor profile by now?

It also looks super pretty, so there’s that.

chickelast.jpg

Stuffed Chicken with Grapes & Olives

Inspired by this recipe from Smitten Kitchen

Ingredients:

1 cup of ricotta

pinch of red pepper flake to taste

1 teaspoon dried oregano

salt and pepper

4 skinless boneless chicken breasts

1 cup red or black seedless grapes

1 cup assorted olives, pitted

drizzle of olive oil

sprinkle of paprika

Directions:

Heat oven to 375 degrees.

In a small bowl mix ricotta with red pepper flake, oregano, and salt and pepper to taste. Set aside.

Using a small sharp knife, create a pocket in the middle of each chicken breast.

Divide the ricotta mixture equally among the 4 chicken breasts stuffing each pocket and pulling them closed. Place the breasts on an oven proof dish or roasting pan. Distribute grapes and olives among the chicken. Season the chicken with salt and pepper and then lightly sprinkle each breast with a little paprika. Drizzle the entire dish with olive oil and throw into the oven.

Roast chicken for about 45 minutes to an hour or until chicken is cooked through and grapes and olives have caramelized and gotten soft and juicy. Toss the grapes and olives a few times throughout the roasting time to ensure even cooking.

When finished roasting, transfer chicken, grapes and olives to a plate and immediately add a little water to the hot baking dish. Using a fork or whisk, scrape up all the brown bits and caramelized goodness to create a simple, quick, pan juice. Season this if needed, and then pour over chicken and fruits and serve.

Serves 4

Stuffed Prosciutto Wrapped Chicken with Roasted Plums

Do you remember when I teased you all with this on instagram approximately five million days ago?

I think I captioned it something like: “THIS IS THE BEST THING I HAVE EVER MADE. EVER.”

Although probably not so shouty on the gram caption. But that’s how I was saying it in my kitchen as I was shooting the photographs and shoving forkfuls of it into my mouth (in the name of taste testing, obviously.)

I think I also promised it would be posted super soon. According to instagram that was...a month and a half ago. Whoops. My bad.

And unfortunately plum season has come and passed. Again...my bad.

But listen, you could leave the plums out and it’s not that they wouldn’t be missed, but it wouldn’t be the worst. You still get a tiny pop of sweetness from the balsamic reduction to play against the saltiness of the prosciutto and feta. You also could hold off on this until we get back to stone fruit season. It might even be worth the wait.

I just can’t help sharing this now because it can be made other ways. Originally I had wanted to do this with fresh figs, which I am sure would have been hella dreamy, but I missed the season for that. Plums seemed like they would work just as well and clearly I was not disappointed. I was ALSO thinking that some grapes would be terribly delicious here as a substitute, which you could do right now. Whatdaya think?

If you try it with grapes, let me know how it is!!


Stuffed Prosciutto Wrapped Chicken with Roasted Plums

Ingredients:

4 boneless skinless chicken breasts

1 cup crumbled feta (I used goat's milk feta, but any will do!)

salt and pepper

4 pieces prosciutto

5 plums, pitted and quartered

few sprigs of thyme

1 cup balsamic vinegar

Directions:

Heat oven to 350 degrees.

Using a small sharp knife create a pocket in the middle of each chicken breast. Divide and stuff the feta equally among the four chicken breasts. Season each breast with salt and pepper and then wrap each breast in one piece of prosciutto.

Place chicken pieces in an ovenproof baking dish. Distribute plum slices around the chicken pieces. Scatter a few sprigs of thyme around the dish on top of the chicken.

Roast in oven uncovered for approximately 40 to 45 minutes or until chicken is thoroughly cooked through.

While chicken is roasting, place one cup of balsamic vinegar in a small saucepan. Bring vinegar to a boil and then reduce heat to low. Let vinegar reduce by half, until thick and syrupy. About 20 to 30 minutes. Remove from heat, let cool, and place in airtight container. Will keep, refrigerated, for many weeks.

When chicken is ready to be served, drizzle with the balsamic vinegar reduction.

Broccoli Cauli-Rice Chicken Bake

IMG_2395.JPG

Sometimes in life you just need to eat a big bowl of comfort. Amirite? Or amirite?

Even though it’s warming up a bit this week, the Northeast lately has generally been fucking cold. The boyfriend and I hadn't realized until recently that our crappy old radiator in the living room had been essentially OFF for the past two winters. Oops. So until we came to our senses a few weekends ago, I had been serving us terribly comfy and warming dinners while we plunged into another weekend “Wire” binge-a-thon.

This was one of those meals. I mean, what’s more comforting than what’s essentially a heaping bowl of thickened heavy cream? Listen, there are vegetables and lots of protein in there so it’s decidedly virtuous. Especially more so than a bowl of cheese sauce and noodles. Don’t get me wrong, I have nothing against macaroni and cheese. I am the damn queen of macaroni and cheese. I am known for my macaroni and cheese. But on a regular old weekday or weekend night, I feel better about digging my frostbitten fingers into lots of vegetables with cheese sauce rather than cheese covered carbs.  

P.s. Don’t let that unassuming yellow hued iPhone photo dissuade you from making this exceptionally cozy dish. It’ll warm you right up.

p.p.s I just added a  "Subscribe" feature on the sidebar to the right! If you'd like to be notified when a new recipe is up, just type in your email address and hit subscribe and you'll get an email each time I post! Also don't forget you can also add me on instagram, facebook, pinterest and twitter! 


Broccoli Cauli-Rice Chicken Bake

Ingredients:

2 chicken breasts with skin and bone (or about 2 cups cooked chicken)

olive oil

salt and pepper

1 head broccoli

1 head cauliflower

1 ½ cups heavy cream

1 teaspoon dijon mustard

1 cup shredded cheddar cheese

¼ cup shredded parmesan

½ cup shredded cheddar cheese for sprinkling the top

Directions:

Heat oven to 400 degrees

Roast chicken breasts in oven seasoned well with salt and pepper and drizzled in olive oil until cooked through and golden brown. About 40 to 45 minutes. ***(Or just use leftover cooked chicken, about 2 cups OR no need to use chicken at all! I used chicken to bulk this up to a main, you can leave the chicken out and serve as a side!)

Line a sheet tray with parchment paper.

Cut your broccoli into smallish florets and “rice” cauliflower in a food processor or using a box grater until you have approximately 2 cups worth.

Spread half the pan with the riced cauliflower and the other half of the pan with the broccoli, drizzle vegetables with olive oil and season with salt and pepper. Throw into the oven with the chicken for about the last 20 minutes of the chicken’s cook time.

While chicken and vegetables are roasting, get cream reducing down in a small sauce pan over a medium to low heat. Season cream with salt, pepper and mustard and stir continuously. Using a whisk is best. Keep cream at a simmer, try to keep it from boiling. It will take about 15 minutes to start to thicken a bit. Once it’s pretty hot and starting to get thick, add in the shredded cheeses. Whisk cheeses into hot cream until they've melted into a creamy thick cheese sauce. Taste for seasoning. Remove from heat.

Remove chicken and vegetables from oven once done. Chicken should be a light golden brown and cooked through. Vegetables should be starting to get caramelized.

Lower oven heat to 350 degrees.

After removing the bones, shred the cooked chicken into bite size pieces and add to ovenproof casserole dish. To the chicken, add roasted broccoli florets and about 2 cups of the riced roasted cauliflower. Give this a good stir to distribute the chicken and veggies evenly. Pour the cheese sauce over the chicken and vegetables and stir again to distribute cheese sauce evenly. Sprinkle remaining ½ cup of shredded cheddar over the top of the casserole.
Bake for 30 to 40 minutes or until the top is a delightful golden brown.

Serves 6

(Reheats and freezes well)

Chicken Enchilada Casserole

This casserole was the win of my weekend.

I had a blog-cooking-extravaganza a couple weekends ago in preparation for my time away. So after a lot of cooking and several recipe test fails, I was at my wit's end and about to call it quits. This was one of my final tests, and I had no clue if it was gonna work out and if it hadn’t, I’m not sure I would of handled it well. Even before that, this was a re-route from an original plan because as mentioned on Monday, cauliflower was no where to be found.

I mean seriously, at one point there was glass and coffeecake all over my kitchen floor.

I am now loaf pan-less and you are now coffeecake-less.

But. YES. YES. YES. This casserole worked. And it completely made up for those few fails that occurred.

That stain is never gonna come out.

That stain is never gonna come out.

I think that removing the eggplant skin is key and having a mandoline definitely makes things easier. I was able to get super thin slices of eggplant that truly resembled tortilla-like layers. The directions of course look excessive, but I promise it took me no longer than the thirty minutes it takes for the eggplants to sweat to get the other two components together, and assembling shouldn’t take more than five.


Chicken Enchilada Casserole

Ingredients:

Casserole

1 large eggplant, skin removed and sliced thinly lengthwise (my mandoline made quick work of this --- the aim is to make these work like tortillas or lasagna sheets would), total of 12 big slices (you may have a few extra smaller slices, roast those babies up, if you please!)

salt (for sweating the eggplant)

Chicken filling (ingredient list below)

Enchilada Sauce (ingredient list below)

2 cups of shredded cheddar cheese

Chicken filling

splash of olive oil

1 small onion, diced

1 small tomato, roughly chopped

1 sweet pepper, diced

1 jalapeno, minced

2 chicken breasts, cooked and shredded

½ teaspoon garlic powder

½ teaspoon cayenne

1 teaspoon cumin

1 teaspoon paprika

salt and pepper to taste

Enchilada Sauce

splash of olive oil

1 small onion, diced

1 garlic clove, minced

4 medium tomatoes, roughly chopped, approximately 2 cups

2 tablespoons chili powder

1 teaspoon paprika

¼ teaspoon oregano

¼ teaspoon cumin

¼ cup shredded cheddar cheese

salt and pepper to taste

Directions:

First things first, get your eggplant slices sweating by laying them on a flat surface and sprinkling them with a bit of salt and letting them rest for approximately 30 minutes.

While the eggplants sweat, get the olive oil heating in medium pan over medium heat. Add the onions, tomato, pepper, and jalapeno to the pan. Cook until onions and peppers are soft and tomato is wrinkly. Add the chicken to the pan and stir to combine the ingredients. Add in the spices and stir in to incorporate. Season with salt and pepper to taste. Remove from heat.

For the enchilada sauce, get a splash of olive oil heating in a small sauce pan over a medium heat. Add in the onion, garlic, and tomatoes and cook until the onion is soft and translucent and the tomatoes are starting to break down. Add the chili powder, paprika, oregano, and cumin. Stir in spices well. Continue to cook until the tomatoes have broken down completely and it’s starting to resemble a sauce, approximately another 10 minutes. Stir in the cheddar cheese. Once the cheese has completely melted into the sauce, taste for seasoning and then remove from heat. Optional move: once it's cooled a little, blitz the sauce with a hand blender or regular blender for a super smooth sauce.

If you’re a real awesome pro, you can attempt to do the filling and sauce at the same time.

Heat oven to 350 degrees.

Using an 8x8 inch square baking dish, prepare to assemble the casserole.

With a paper towel, dab off the “sweat” from the eggplant slices.

Spread about a tablespoon or so of the enchilada sauce on the bottom of the baking dish. Next add the first layer of 3 eggplant slices, they can overlap slightly. Take about ⅓ of the chicken filling and spread it on top of the eggplant, then spoon on about ¼ of the enchilada sauce and lastly sprinkle on some of the cheese. Layer on 3 more eggplant, then start again with the chicken, the sauce and the cheese. You’ll do this for a third time, and then top with the last layer of eggplant, use the last of the sauce on top of the eggplant and sprinkle on the remaining cheese and then place in oven for about 40 minutes until the cheese is golden and bubbly and the eggplant is tender.

Serves 4 to 6

Pulled Pork with Chipotle Barbecue Sauce

First things first, I need to get this off my chest ---- it’s really hard to make a pile of meat look photogenic.

There. I said it.

Moving on.

A big beautiful brioche bun, toasted, might have made this a little more fantastic looking, but we don’t do buns too often here in the sizzle & sass kitchen. A side of slaw though, I believe is, requisite. Spicy Slaw would have been great here, but I was unfortunately jalapeno-less. (It went into something awesome destined for the internets sometime next week.)

But let’s talk about the here and now. Pulled Pork and Chipotle Barbecue Sauce.

Normally I would have done this with a pork shoulder. But my mother had given me half of a 9 pound pork loin she’d bought. I needed to use it ASAP, since I’d been keeping it in the freezer at work, but then it got kicked out. And because, as previously mentioned, I’ve been desperately filling my freezer with summery goodies getting ready for my winter hibernation, I had ZERO space left for 5 pounds of pig.

So pulled pork it was! Even at the end of August when summer definitely decided to make a comeback and pulled pork meant that my oven had to be on for like five straight hours. Despite the heat it produced, it was worth it. Pulled pork is always worth it.

The barbecue sauce was one of those things where I surprised even myself. I went completely off track with it, and didn’t bank on it turning out necessarily well. Probably well enough for me and the partner in crime to eat, but not necessarily good enough to post about.

Well, if that wasn’t further from the truth. So, there are a lack of pictures of the sauce undertaking but who cares, make this sauce. I adapted it like crazy from my lovely, amazing, and best chef friend who’s blog you can read here and recipe you can find here.

I wanted to get it as clean and paleo-esque as possible. So I switched out the ketchup and the brown sugar, and ditched a few other things and adapted to what I had available, hence the chicken stock substitution. But Sean’s original recipe was a great starting point, including the fact that it has coffee in it which ties into the pulled pork recipe as well as ties into my life as a complete and total coffee addict.

For that super simple slaw pictured, I just slivered up some red and green cabbage, red onion and some bell pepper and tossed it in the dressing that I used for my Slightly Spicy Slaw.


Pulled Pork

Ingredients:

5 pound pork loin or shoulder or butt

2 tablespoons salt

¼ teaspoon ground black pepper

1 tablespoon cumin

1 tablespoon paprika

1 tablespoon garlic powder

1 tablespoon cayenne

1 teaspoon oregano

1 tablespoon olive oil

3 tablespoons maple syrup

1 teaspoon apple cider vinegar

3 to 4 smashed garlic cloves

1 cup freshly brewed black coffee (or other liquid -- I’ve done this with beer, water, orange juice -- sugary stuff burns off though and quickly, if using, make sure to keep basting and adding liquid when it cooks off)

Directions:

Heat oven to 350 degrees

Prep your meat as needed, remove the skin if there is any on it and then place it fat side down in your baking dish. I used my 5.5 quart dutch oven and it worked beautifully in keeping the meat covered when needed and moist. Set aside meat and prepare the spice rub.

In a small bowl, mix salt, pepper, cumin, paprika, garlic powder, cayenne, oregano, olive oil, maple syrup, and vinegar well until fully incorporated. Rub this all over the pork, getting into all the nooks and crannies.

Throw the smashed garlic into the bottom of the pan and then pour in the coffee.

Put into the oven covered, basting occasionally for at least four hours or until a fork easily pierces the meat and looks shreddable. About 2 and half hours in you can remove the cover so that the pork will develop a nice crust. Allow the pork to rest approximately 20 minutes before shredding. I also recommend straining out the braising liquid and reserving to pour over the shredded meat.

You can toss with Chipotle Barbecue Sauce (recipe follows) or any barbecue sauce, but it has more than enough flavor to be eaten on its own..

Yield: approximately 2 quarts of meat

Chipotle Barbecue Sauce

adapted from this recipe over at Home Grown Meals

Ingredients:

splash of olive oil

1 small onion, minced

4 cloves garlic, minced

2 chipotle peppers (from a can), minced

1 tablespoon of the chipotle sauce that’s in the can with the peppers

1 ½ cups chicken stock

½ can of tomato paste

1 cup freshly brewed black coffee

1 cup apple cider vinegar

1 cup maple syrup

2 tablespoons mustard

1 tablespoon oregano

1 tablespoon paprika

Directions:

The barbecue sauce takes about one hour to be ready so you can do ahead of time or to have ready with pork start about halfway through it’s total cooking time.

Get the olive oil heating in a medium sized saute pan over a medium heat and then throw in the minced onion. Cook until soft, translucent, and a touch caramelized. I like using a saute pan for this because it has more surface area and it takes less time to reduce down to a thick sauce.

While the onion cooks down, in a bowl whisk together the coffee, vinegar, syrup, mustard, oregano and paprika. Set aside.

Add the garlic and chipotles to the pan with the onions. Stir in until fragrant and then add the chicken stock, tomato paste and stir to incorporate. Let this mixture cook until it’s thickened slightly, 3 to 5 minutes.

Add the coffee-vinegar mix to the pan and stir to combine. Let the sauce come to a boil then turn down heat to a simmer, stirring occasionally. Sauce will take about 30 to 45 minutes to reduce down and come to desired consistency.

Optional move here at the end: I blitzed mine with a hand blender so it would be super smooth. You can do this, or let it cool a bit and do it with a regular blender. It's also not that chunky at all depending on how small you cut your onions and garlic. Choice is yours, my friends.

Yield: approximately 2 cups

Eggplant Parmesan

Man, this recipe seems like a to-do all typed out. I guess anything with multiple cooking steps is going to look a little crazy. Re-inventing the wheel with this one? No, not really. But when you have eggplants, what’s better to do with them than make eggplant parm? Probably many things, but flow with me here.

Truth be told, I am not the biggest eggplant fan. I think it might be it’s skin? At times I find it plasticky. I do best when it’s sliced super thin or cubed into the tiniest of squares that will melt into a sauce. And I am sure I am not alone in the belief that the act of frying makes all things edible.

One change I made here was just to sub out the usual bread crumbs for a mix of almond meal and grated parmesan. Works like a charm. I also find my latest presentation to be just the prettiest. I realize though, that most people probably don’t have a giant circular pan like that. In the instructions I give a few suggestions as to how else you can bake the eggplant.

I’ve done this several times and I’ve almost always had the perfect amount of egg and breading to eggplant slices. But if for some reason you end up with extra eggplant slices, I would just roast them up with a little olive oil and salt and pepper when you throw the parm in the oven.

If you end up with extra breading, since it’s not like it’s getting contaminated by meat or something, just freeze it up to use at a later time. Er, well I guess some egg might get all up in there, but I would probably still freeze it. It works great for chicken parm. Although I did find it a bit heavy for squash blossoms when I was experimenting with them. But usually this is my go-to breading for everything.

Last time I had a bit extra, I had a green tomato hanging out on the counter.

I’m sure you can put together what happened next.


Eggplant Parmesan

Ingredients:

2 medium to large eggplants

salt (for sweating)

2 large eggs

1 cup almond flour

1 cup grated parmesan

1 tablespoon fresh parsley, finely chopped (or a good pinch of dried)

salt and pepper to taste

approximately ¼ cup olive oil for frying

2 cups of tomato sauce, either Fresh Sauce or a good homemade or jarred red sauce.

8 oz. fresh mozzarella, sliced thin or 1 cup shredded mozzarella

Directions:

Using a mandoline or a knife, slice the eggplant into thin ¼ inch disks.

Lay out disks on a flat surface like a cutting board or sheet pan and lightly salt the eggplant. Let sit and sweat for approximately 30 minutes.

Meanwhile, prepare your “breading” station. In a large bowl beat two large eggs together. In a large plate or baking dish combine the almond flour, parmesan, parsley, and salt and pepper.

After 30 minutes, using a paper towel, dry the “sweat” off the eggplant slices and place slices in the bowl with the beaten eggs. Swish around eggplant to cover all slices with egg.

I find it easiest to “bread” all the slices before frying instead of trying to multitask breading and frying at the same time. Something always gets backed up.

One by one take each egg soaked slice and dip each side into the almond flour-parmesan “breading” and lay them down on a flat surface to wait to be fried up.

Once all the slices are breaded, heat about half of the olive oil in a medium to large saute pan over a medium heat. While this is heating, prepare a plate with paper towels to place finished fried slices onto.

When the oil is hot enough (you can dip the end of a wooden spoon into the oil and see if it sizzles) place as many eggplant slices that will fit, into the pan. Fry until golden on the first side and do the same with the second side. Take off heat and place on paper toweled plate to drain. Do this with all the slices. About halfway through frying I like to start with some fresh oil since the almond flour has a tendency to fall off a little more and burn up pretty quick. So I pour off the hot oil into a heat safe container to cool a bit before throwing out and then I carefully wipe out the pan with a paper towel. Then I pour in the remaining olive oil and bring it up to heat and keep on frying.

Once all your eggplant is fried turn on the oven to 350 degrees.

Grab the eggplant, two cups of sauce, and mozzarella cheese.

Depending on the type of baking pan you have available begin layering the eggplant in a way that makes the most sense to you.

As you can see in the pictures, I have a 1-inch deep circular roasting pan, so I overlapped mine in circles, starting with a splash of sauce on the bottom of the pan and then layering the slices one by one around, adding the rest of the sauce and then covering in cheese. If you only have a flat pan, or baking dish you could do all the slices in one layer, with spoonful of sauce on top of each slice and then a piece of cheese on top of that. Or you could layer them up in a baking dish like a lasagna! Whatever works. Just get that sauce and cheese on there!

Bake the eggplant parm for about 40 minutes or until cheese is golden and bubbly.

Serves 8