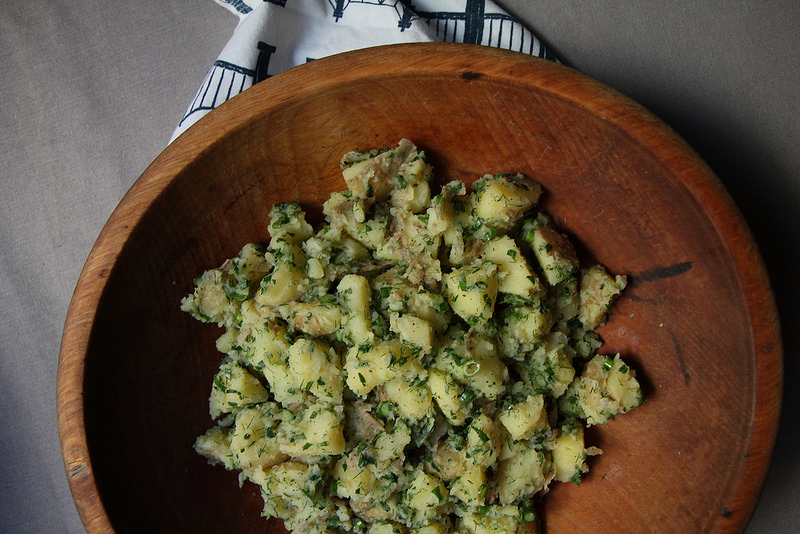
Herby Potato Salad

What I did not inherit from my mother:

her green thumb

What I did:

her very low tolerance for mayonnaise

My mother’s potato salad has taken on varying forms over the years, but rarely did they include mayonnaise in the description. She’s also a woman whose many recipes that she is “known” for aren’t exactly written down. She throws things in and tastes her way through her summer classics like her tabbouleh salad, her bean salad, corn & peppers, and blackberry sauce.

Her potato salad is no different and this July 4th’s variation was simply every herb she had growing in the garden and some lemon juice and oil. The other trick she had up her sleeve was this: I noticed that the potatoes were cooking on the stove for what seemed like an awfully long time. I thought she had forgotten about them but after I reminded her about them, she rather lackadaisically (IMO) got off the couch and ran them under cold water. She then chopped them up carefully and folded them into the other ingredients carefully, tasted her way through it carefully, and then threw it into the fridge to meld overnight for the party the next day. From my point of view, forgetting about the potatoes seemed now very, very on purpose.

By any other standards, she for sure overcooked her potatoes, but for the sake of the recipe, I fully believe she gets away with the lack of mayo because of this. The potatoes' mushy texture creates a creaminess you would not have otherwise. You just have to be careful with mixing it together so you don’t end up with mashed potatoes. 

She’s pretty genius, my mother...which I hope I inherited from her too…


Herby Potato Salad

Ingredients:

2 pounds yukon gold potatoes

2 garlic scapes, sliced small

1 tablespoon finely chopped chives

1 tablespoon finely chopped parsley

1 tablespoon finely chopped dill

juice of one lemon

¼ cup olive oil

salt & pepper to taste

Directions:

In a large pot, cover the potatoes with cold water and over high heat bring to a boil. Lower to a simmer, and cook potatoes until very soft when pierced with a fork. Drain the potatoes and rinse under cold running water for a few minutes. Set aside.

Throw all your chopped herbs together in a large bowl. Cut the potatoes into 1 inch chunks and while they’re still a touch warm on the inside, toss them together very gently with the herbs, lemon juice, olive oil and seasoning. Put in fridge to chill for a few hours or overnight. Serve cold.

Like most picnic salads, potato salad is better the next day. And according to my cousin Evelyn, tossing it while warm allows for the flavors to really integrate into the potato chunks and because Evelyn’s potato salad is hella awesome, I have to believe her.

Serve 6 to 8

Strawberry Cornmeal Pancakes

Once upon a time I went to film school. I spent four years studying the art of filmmaking and earning a rather questionable bachelor’s degree since our studio classes took extreme precedence over our regular humanities courses. Among the cast of characters I met along the way, my production professor was definitely the most memorable in the best way.

He had an enviable handlebar mustache, an unruly mop of charcoal grey hair, and was the type to wear sunglasses at night. He had a thick eastern European accent and was a goldmine of amazing yet basically untranslatable idioms. One of his classics was not to “confuse frogs with grandmothers” followed by “it rhymes in my language”. It tended to leave the majority of our class scratching our heads as he usually applied it any situation he felt it called for. I had an affinity for his sayings that had to do with food, for now obvious reasons. He always compared filmmaking to making soup. When he wanted you to think about something or work on something a little longer he would say, “let it simmer”. When adding to the conversation, he would “add bacon to the pan” but not because he liked bacon, but because “I just like the sizzle”.

batter2.jpg

Since starting this weird food writing journey, besides a brilliant piece of editing advice (“use the axe, not the tweezers”), the line I think of most happens to be about pancakes. When we were in film school, he was essentially applying it to first drafts of the screenplays, first takes of the shoot, first editing passes of the film. But now in my second life, I am applying his advice in the most literal manner.

Here’s what you need to know, and this is some deep shit, so get ready. It can be applied literally and figuratively as I’ve already pointed out. But basically, remember when making pancakes or anything else --- that “the first pancake is always bad”.

Oh man, it’s like the truest thing anyone has ever said. Legitimately changed my life. I think of it every.single.time. I make pancakes and never feel bad when the first one is terrible. Even these. Although I do have to say, practice can make perfect. I tend to over butter the first time around which kind of deep-frys the pancake. Sounds good in theory but that’s not what makes a perfect pancake. Low heat is important; the key to pancakes is patience. If the pan is too hot, the outside and the butter will burn, but the inside will be raw. So remember --- lower heat than you think, less butter than you think, more time than you think along with the most patience. And this, the best advice of all, remember that “the first pancake is always bad”.

Now just because I have no idea how to segue into this, can I let you in on a little secret? Not only are these pancakes so seasonal, made from mostly local ingredients, quite possibly organic and totally gluten free --- they’re also birthday pancakes. June 29th was sizzle & sass kitchen’s first birthday. Since my first post, every day behind the stove, the camera, and the keyboard in the pursuit of this site has never felt more right. This project has turned into a full-on passion and there’s really nothing I’d rather do with my days. Thank you to those of you who take the time to read these posts. Here’s to many more! Let’s toast with these pancakes.


Strawberry Cornmeal Pancakes

adapted from this smitten kitchen recipe

Ingredients:

¾ cup rice flour

¾ cup fresh milled organic fine ground corn flour

½ teaspoon sea salt

½ teaspoon baking soda

½ teaspoon baking powder

1 cup buttermilk

2 tablespoons maple syrup or honey

2 eggs

3 tablespoons melted butter (plus extra for greasing griddle)

1 cup roughly chopped strawberries

Directions:

Heat oven to 200 degrees.

In a large bowl, mix rice flour, corn flour, salt, baking soda, and baking powder.

In a second bowl, whisk together buttermilk, maple syrup, and the two eggs. Lastly, whisk in the melted butter. Switch to a wooden spoon and gently stir in the strawberries.

Add the wet ingredients to the dry and using the wooden spoon, gently fold the batter until it just comes together.

Heat a skillet over low to medium heat. Melt just enough butter to lightly coat the skillet. Using a ¼ cup measure, scoop a ¼ cup of batter onto the skillet. The batter is a bit thicker and doesn’t spread as easy so I found that I needed to flatten the batter a bit into a pancake with my fingers. Let it cook on the first side for about two minutes, until golden brown and cooked through. Flip and cook until golden on the second side. Place in a 200 degree oven to keep warm, if desired. Continue with remaining batter.

Serve with whipped cream and maybe rhubarb sauce if you want to be annoyingly seasonal or plain ole’ maple syrup or overkill it with some homemade strawberry jam like I did the second these pictures were done.

Makes about 8 four-inch pancakes. If you're really awesome you could probably get 10. Serves 4 to 5.

Spinach Salad with Grapes & Olives

So this one time I made this chicken and then had a ridiculous amount of grapes and olives left over. After the chicken was long gone, I still had to come up with some sort of lunch for work, you know, all adult-like. I stole some baby spinach from the boyfriend and a salad was born. Paired it with some hard boiled eggs for the protein factor and voila! Lunch! I wish it was always that easy.

We’ve got punchy, salty, fermenty olives, sweet black grapes, spicy pepperoncinis, more salty but creamy feta, crunchy toasted sunflower seeds, and a hefty squeeze of puckery lemon.

You couldn’t have more flavors and textures going on at once, and it is damn pleasing.

Being both a supertaster and a recovering sectional eater, I never would have thought that a salad such as this would ever grace my plate.

Supertaster? Huh? Yea, it totally exists and helped to explain much of my life prior to learning about it. Over the years, I’ve been able to train my palate to be more accepting of overpowering flavors --- anything fermented, vinegar, red onion, any and all things anise flavored, bitter, sour, sweet, salty --- everything is just more intense. I’m better with textures than I used to be, but I didn’t eat avocado for the better part of two decades because I couldn’t get over the weird butteriness of it. And until I was about 21, nothing . could . touch . I was a big fan of things “on the side.”

While I am still able to find that ONE piece of stray arugula that snuck it’s way into my salad bar romaine, LOATHE, I’ve gotten better! I could drink my homemade vinegar based dressings, I pickled red onions this summer, and I’ve come a long way in the mixing and matching of meals. You can look for no further proof than this salad.


Spinach Salad with Grapes & Olives

Ingredients:

8 ounces spinach

1 cup mixed pitted olives, halved

1 cup red or black seedless grapes, halved

¼ cup crumbled feta

¼ cup sunflower seeds

2 to 3 pepperoncini peppers, sliced

juice of half a lemon

good drizzle of olive oil

salt and pepper to taste

Directions:

Assemble spinach, olives, grapes, feta, sunflower seeds, and pepperoncinis in a large serving bowl.

Squeeze the half of the lemon over the top of the salad (or like, be responsible, and do this in separate bowl to avoid rogue seeds), give a good drizzle of olive oil over top, and then do salt and pepper to taste. Go light on the salt at first due to the feta and olives, don’t want it to get too salty.

Toss all ingredients until well combined.

Serves 6 as a starter or side

Shredded Brussels Sprouts Salad

parmshavings.jpg

Now that we are firmly in resolution territory….brussels sprouts and kale for everybody!

Amirite? Or amirite? Great!

As already discussed, I am one of those suckers that looks forward to January 1st for that giant, metaphorical reset button. In life, in health, in food.

I mentally press it with all my might the second I pop out of bed New Year’s Day and get excited to start eating super cleanly again, as though I needed permission to do so.

This salad is decidedly virtuous. I get a straight up health high knowing how good it probably is for me. Between the sprouts, the ever true health beacon that is kale, and the endless pops of anti-oxidants as I chew down on those pomegranate seeds. Oh MAN! I am so good at being healthy!

Please don’t hate me when I post so many salads over the next coming weeks. I’ll come to my senses eventually and balance all this clean eating shit out with some sort of sinful something.

I promise. <3


Shredded Brussels Sprout Salad

Ingredients:

Dressing:

3 tablespoons of olive oil

1 tablespoon of sherry vinegar

2 teaspoons of maple syrup

squirt of mustard

salt and pepper to taste

Salad:

1 pound brussels sprouts

½ bunch of kale

½ cup of toasted hazelnuts, roughly chopped

seeds of 1 pomegranate

¼ cup of shredded parmesan

Directions:

Whisk olive oil, vinegar, syrup, mustard, salt and pepper together until combined. Set aside.

Thinly shred brussels sprouts (the easiest way is to use a mandoline) and chiffonade the kale leaves by destemming them, layering them on top of one another and then rolling them up into a long tube. Cut across tube to create thin strips of kale.

To assemble salad --- toss brussels sprouts and kale with hazelnuts, pomegranate seeds and parmesan. Drizzle dressing on top and then gently toss again to coat evenly in dressing.

Serves 6 as a side.

Eggplant Parmesan

Man, this recipe seems like a to-do all typed out. I guess anything with multiple cooking steps is going to look a little crazy. Re-inventing the wheel with this one? No, not really. But when you have eggplants, what’s better to do with them than make eggplant parm? Probably many things, but flow with me here.

Truth be told, I am not the biggest eggplant fan. I think it might be it’s skin? At times I find it plasticky. I do best when it’s sliced super thin or cubed into the tiniest of squares that will melt into a sauce. And I am sure I am not alone in the belief that the act of frying makes all things edible.

One change I made here was just to sub out the usual bread crumbs for a mix of almond meal and grated parmesan. Works like a charm. I also find my latest presentation to be just the prettiest. I realize though, that most people probably don’t have a giant circular pan like that. In the instructions I give a few suggestions as to how else you can bake the eggplant.

I’ve done this several times and I’ve almost always had the perfect amount of egg and breading to eggplant slices. But if for some reason you end up with extra eggplant slices, I would just roast them up with a little olive oil and salt and pepper when you throw the parm in the oven.

If you end up with extra breading, since it’s not like it’s getting contaminated by meat or something, just freeze it up to use at a later time. Er, well I guess some egg might get all up in there, but I would probably still freeze it. It works great for chicken parm. Although I did find it a bit heavy for squash blossoms when I was experimenting with them. But usually this is my go-to breading for everything.

Last time I had a bit extra, I had a green tomato hanging out on the counter.

I’m sure you can put together what happened next.


Eggplant Parmesan

Ingredients:

2 medium to large eggplants

salt (for sweating)

2 large eggs

1 cup almond flour

1 cup grated parmesan

1 tablespoon fresh parsley, finely chopped (or a good pinch of dried)

salt and pepper to taste

approximately ¼ cup olive oil for frying

2 cups of tomato sauce, either Fresh Sauce or a good homemade or jarred red sauce.

8 oz. fresh mozzarella, sliced thin or 1 cup shredded mozzarella

Directions:

Using a mandoline or a knife, slice the eggplant into thin ¼ inch disks.

Lay out disks on a flat surface like a cutting board or sheet pan and lightly salt the eggplant. Let sit and sweat for approximately 30 minutes.

Meanwhile, prepare your “breading” station. In a large bowl beat two large eggs together. In a large plate or baking dish combine the almond flour, parmesan, parsley, and salt and pepper.

After 30 minutes, using a paper towel, dry the “sweat” off the eggplant slices and place slices in the bowl with the beaten eggs. Swish around eggplant to cover all slices with egg.

I find it easiest to “bread” all the slices before frying instead of trying to multitask breading and frying at the same time. Something always gets backed up.

One by one take each egg soaked slice and dip each side into the almond flour-parmesan “breading” and lay them down on a flat surface to wait to be fried up.

Once all the slices are breaded, heat about half of the olive oil in a medium to large saute pan over a medium heat. While this is heating, prepare a plate with paper towels to place finished fried slices onto.

When the oil is hot enough (you can dip the end of a wooden spoon into the oil and see if it sizzles) place as many eggplant slices that will fit, into the pan. Fry until golden on the first side and do the same with the second side. Take off heat and place on paper toweled plate to drain. Do this with all the slices. About halfway through frying I like to start with some fresh oil since the almond flour has a tendency to fall off a little more and burn up pretty quick. So I pour off the hot oil into a heat safe container to cool a bit before throwing out and then I carefully wipe out the pan with a paper towel. Then I pour in the remaining olive oil and bring it up to heat and keep on frying.

Once all your eggplant is fried turn on the oven to 350 degrees.

Grab the eggplant, two cups of sauce, and mozzarella cheese.

Depending on the type of baking pan you have available begin layering the eggplant in a way that makes the most sense to you.

As you can see in the pictures, I have a 1-inch deep circular roasting pan, so I overlapped mine in circles, starting with a splash of sauce on the bottom of the pan and then layering the slices one by one around, adding the rest of the sauce and then covering in cheese. If you only have a flat pan, or baking dish you could do all the slices in one layer, with spoonful of sauce on top of each slice and then a piece of cheese on top of that. Or you could layer them up in a baking dish like a lasagna! Whatever works. Just get that sauce and cheese on there!

Bake the eggplant parm for about 40 minutes or until cheese is golden and bubbly.

Serves 8

Butter and Dill Carrots

Every summer I get to spend a long weekend in the beautiful state of Maine visiting family. It’s the kind of place where there’s a mile between all the houses and you don’t hear anything but sounds of nature all day long. They live in the dead middle of the state and their house is surrounded by nothing but trees and open skies.

My cousin Evelyn cultivates a huge, beautiful garden. This year’s bean stalks were taller than me and there were tomatoes for days.

Late one morning she harvested a few pounds of baby carrots and barely ten minutes later they were simmering on the stove top destined for lunch.

What she served us was so simple and also just so good. The combination of flavors was something I’ve never encountered before. It felt both fresh and rich at the same time. It was so different from anything I've ever had that I asked for permission to share it on here.

The dill and carrots pictured are her gorgeous produce. I mean look at those cute little "tails"!


Butter and Dill Carrots

Evelyn’s Recipe

Ingredients

1 pound fresh carrots, cleaned and trimmed of their tops - ideally the type just recently yanked out of the ground, and on the smaller side if possible. Halve or quarter bigger carrots so they cook through equally

1 tablespoon grass fed butter

1 heaping tablespoon chopped fresh dill

salt to taste

Directions

Bring water to a boil in a 1 quart sauce pot.

Once the water is boiling drop in your carrots. Cook them until just fork tender, about 6 to 7 minutes. This could take longer depending on the size of your carrots.

Strain the water from the carrots and place in serving bowl. While the carrots are still warm stir in butter and dill until the butter has melted and the dill has evenly distributed.

Salt to taste and serve.

Serves 4 as a side

Slightly Spicy Slaw

So I went to Whole Foods one day after the green market for cat food although I was super hungry and me and grocery shopping while hungry never ends in a good way. Believe me, I could’ve made it home for food. Really. But I snuck past the food bar and of course lost my resolve. Now, mistake? Or kismet? I’ve decided on definitely meant to be because I stumbled across something that I’ve probably thought about once a day since. It was called “Firecracker Slaw.” If there’s one thing I adore in life, it’s slaw. I’m that gross person who always eats the tiny cup of half warm coleslaw sent along with that pickle at the diner. As of recently I’ve also started to gravitate towards more vinegar-based dressings and have discovered a whole new world of slaw making.

This Firecracker Slaw was the stuff of my dreams. Not sure if anybody’s noticing a pattern going on, but I like things spicy around here. It was beautifully colored - the red of the cabbage, there were red, yellow and orange bell peppers thrown in, and there they were, slivers of jalapeno. My recreation does not taste exactly like the wholefoods version, but it’s close and it’s GOOD.

Hey, little side note, you’ll notice there’s something called kohlrabi in this. Kohlrabi? Kohlrabi anyone? I received three kohlrabi in my farmshare and was like….what the f….are these?? Since learning more about them, they’ve all gone into slaws and I couldn’t of been more pleased. If you don’t have any kohlrabi lying around or haven’t a clue what it even is (been there girl) just sub in a ½ head of green cabbage instead. Kohlrabi are in the same family as cabbage and broccoli.

14694186409_844c85a898_c.jpg

Hmmm…..broccoli slaw….


Slightly Spicy Slaw

inspired by Whole Foods’ “Firecracker Slaw”

Ingredients:

Slaw

½ head of red cabbage, cored and sliced into long thin strips

1 bell pepper, orange, yellow, or red for color, sliced into long thin strips

½ cucumber, sliced into matchsticks

½ red onion, sliced thinly

1 kohlrabi, peeled and shredded

3 carrots, shredded

1 jalapeno pepper, de-ribbed and de-seeded (or leave in for more heat), sliced into super thin matchsticks

Dressing

3 tablespoons olive oil

1 ½ tablespoons Red wine vinegar

1 tablespoon dijon mustard

2 teaspoons honey

salt and pepper to taste

Directions:

Take all your prepped vegetables and toss them together in a large bowl.

Combine dressing ingredients together in a small bowl and then pour over your slaw. Toss slaw again to distribute dressing.

You can eat it right away, but I always find slaw better when it’s sat a bit and had time to meld it’s flavors and wilt a little.

Roasted Peach Strawberry Chunk Popsicles

14648978708_434e6ab681_c.jpg

Remember those cute bitty strawberries I told y’all about last week? The suspicious ones? Welp, I learned more about them this past farmer’s market visit. They’re called tristar strawberries and they have a much more flexible growing season. So my little suspicious strawbs, are definitely local, totally seasonal, and um, er, wut...oh the organic front? Yea….the jury’s still out. I had already bought them with my eyes before my wallet made it out of my bag and I was afraid to know the answer. So I still don’t know the answer, but the strawberries are little nuggets of summer heaven so I’m surely okay living in denial about them.

I ended up mixing some of them up into something "cool" with the other stars of summer, some sweet local peaches.

14648951069_c589d835a4_c.jpg

Perfect combo.


Roasted Peach & Strawberry Chunk Popsicles

Ingredients:

3 ripe peaches, quartered and peeled

1 teaspoon coconut sugar (or other sweetener)

1 cup almond milk (or any other milk - dairy or non)

1 teaspoon vanilla

1 tablespoon honey

½ cup chopped strawberries (tossed in a touch of honey if desired)

Directions:

Place your quartered peaches on your roasting pan and sprinkle sugar on top and toss in pan to cover evenly.

Throw into an oven at 350 degrees for about 30mins until soft and caramelized.

Remove and let cool.

Once peaches have cooled a bit, place in blender along with almond milk, vanilla, and honey. Blitz until smooth and combined.  

Stir strawberries into the peach-milk base and pour into the popsicle molds.

Freeze until hard, about 5 hours.

Run mold under warm water to loosen.

Makes 8 three ounce popsicles.