What I Really Eat: End of Summer Peach Compote

"What I really eat" are my Iron Chef meals. My pantry meals. Shit, my fridge is empty meals. The things that come out of necessity and lack of time. The ingredient list will usually be small and the execution usually simple. Something that is less of a recipe and more of a guideline. If something exceptionally awesome comes out of my Sunday night scramble, it will get posted as a “What I Really Eat” and probably be accompanied with a not-my-best photo.

It happens to the best of us. You get cocky. You take it for granted and you don’t realize that the last peach you ate, that last really great peach, was going to be the last great one of the season. If you had known, you probably would have savored it just a little bit more, made it last just a little bit longer. But alas, that is life.

I get it. You’re at the farmers’ market and you’re like: psh...it’s almost October? Whatever! Look at all these bins of peaches, they have to be good, right? WRONG. It’s now the time to play end of summer peach roulette. Could get a great one! Could get six really terrible ones.

As I bit into a farmers’ market peach the other night (one of half a dozen I had brazenly brought home), I came to the stark realization that summer might really be over, and therefore eating really great peaches along with it. My peach was mealy and chalky and tasteless. I swear I almost cried. Boyfriend looked over at me and said, “what’s wrong?”, as my shoulders fell and I probably looked like someone had just kicked the cat, and then I spit my bite of peach into the garbage with defeat.

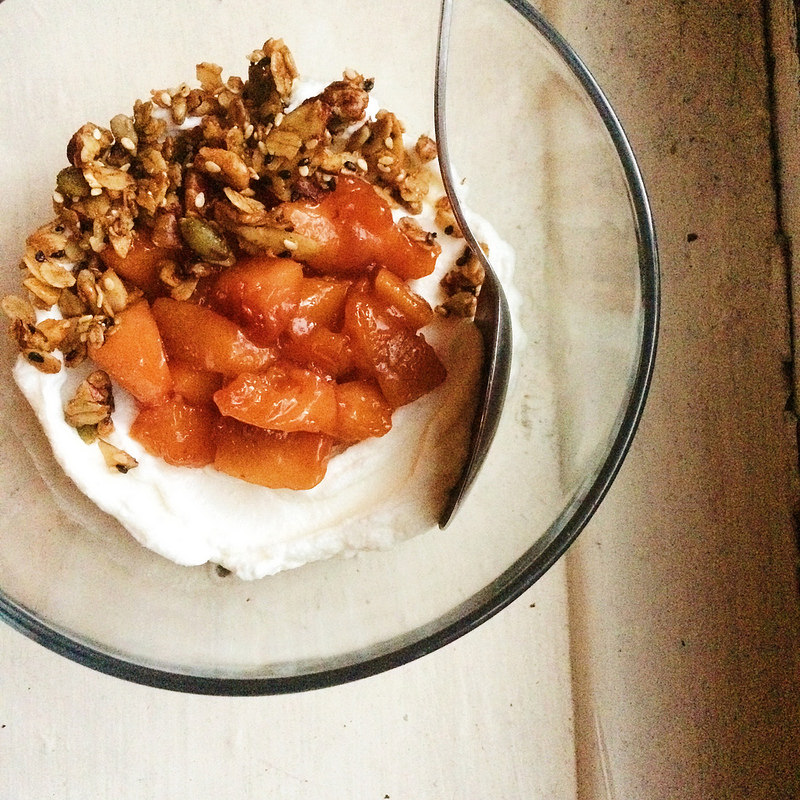
There I was though, half a dozen deep in shitty end of summer peaches that nevertheless pained me to leave to the fruit flies. So I fell back on a mantra that has gotten me through many a questionable situation: When in doubt, make compote

Would cooking these mealy, lackluster things with a little bit of sugar and some lemon juice and maybe a cinnamon stick save them?

The answer was yes.


End of Summer Peach Compote

Ingredients:

5 to 6 peaches, pitted, peeled and roughly chopped

¼ cup raw sugar or other sweetener (or to taste)

juice of half a lemon

one whole cinnamon stick (optional)

Directions:

In a small saucepan over medium heat, bring all ingredients to a light boil, stirring as needed. Lower heat to a simmer and let compote cook down, stirring occasionally for about 30 minutes or until fruit has cooked to desired consistency. Remove cinnamon stick to serve.

Compote freezes well, if you, like me, have an obsession with saving some summer for later. I plan to swirl it into yogurt with homemade granola (via dash and bella) for the rest of the week. It would be at home on toast or ice cream or waffles or pancakes as well. Just sayin.

Makes about 1 ½  cups of peach compote.

Pickled Peaches

Almost a year ago my boyfriend and I were visiting the fair city of Boston and true to character, the first restaurant on our to do list was known mainly for its burger. (jmCurley, if you’re interested in that kinda thing)

First, we ordered some of the tastiest whiskey cocktails we’ve ever had. Then, in lieu of a typical bread basket, what arrived to the table on the house was bacon grease popcorn. We could have stopped right there and I would have been satisfied with the entire excursion. But then in logical “we’re on vacation” YOLO fashion we went on to order an appetizer.

What showed up to our table went beyond all of my expectations. A luscious ball of burrata, surrounded by teensy toasts, prosciutto, pickled peaches, and microgreens all drizzled with a balsamic reduction. It began my head over heels love affair with burrata and introduced me to the pickling of peaches which completely blew my little mind. The burger, mind you, was also completely amazing and lived up to its reputation. But what I went on talking, thinking, and dreaming about for the next six months was that appetizer.

It became an immediate goal to figure out the secret of the pickled peaches. I imagined it might be hard, possibly involve a pressure canner or other unwieldy things that I may or may not have room for in my tiny NYC apartment or time for in my packed NYC schedule. So last year, peach season slipped right on by before I could attempt my hand at adding vinegar to sweet summer peaches and creating pickling magic.

The moment peach season arrived this summer, there was this little voice in my head poking me, tapping me on the shoulder, whispering into my ear as I stood over the peach bin at the farmers’ market. “Hey! Hey you! Don’t forget to pickle some peaches this summer!”

Turns out that it might be one the easiest things I’ve undertaken in the name of this blog. Completely easy and totally worth it. Now I just have to go get myself a big ole’ ball of burrata and re-live that appetizer from heaven experience.


Pickled Peaches

adapted from this Kinfolk recipe

Ingredients:

¾ cup white vinegar

½ cup apple cider vinegar

1 cup water

1/2 cup of maple syrup or brown sugar

3 cinnamon sticks

1 teaspoon whole black peppercorns

1 teaspoon whole cloves

1 whole vanilla bean or 1 teaspoon vanilla extract

pinch of salt

4 ripe but firm peaches, pitted, peeled and cut into eighths

Directions:

In a small saucepan, heat white vinegar, cider vinegar, water, maple syrup, cinnamon sticks, whole peppercorns, whole cloves, vanilla bean, and salt over a medium heat. Stir to combine. Bring mixture to a boil and then let simmer for about 10 minutes.

Meanwhile put prepared peaches into a heat safe container. When pickling liquid is ready, pour over the prepared peaches to cover. Let peaches and liquid sit until room temperature. Then cover and keep refrigerated.

Yield: 1 quart of pickled peaches. Will keep in refrigerator for approximately one month.

Herby Potato Salad

What I did not inherit from my mother:

her green thumb

What I did:

her very low tolerance for mayonnaise

My mother’s potato salad has taken on varying forms over the years, but rarely did they include mayonnaise in the description. She’s also a woman whose many recipes that she is “known” for aren’t exactly written down. She throws things in and tastes her way through her summer classics like her tabbouleh salad, her bean salad, corn & peppers, and blackberry sauce.

Her potato salad is no different and this July 4th’s variation was simply every herb she had growing in the garden and some lemon juice and oil. The other trick she had up her sleeve was this: I noticed that the potatoes were cooking on the stove for what seemed like an awfully long time. I thought she had forgotten about them but after I reminded her about them, she rather lackadaisically (IMO) got off the couch and ran them under cold water. She then chopped them up carefully and folded them into the other ingredients carefully, tasted her way through it carefully, and then threw it into the fridge to meld overnight for the party the next day. From my point of view, forgetting about the potatoes seemed now very, very on purpose.

By any other standards, she for sure overcooked her potatoes, but for the sake of the recipe, I fully believe she gets away with the lack of mayo because of this. The potatoes' mushy texture creates a creaminess you would not have otherwise. You just have to be careful with mixing it together so you don’t end up with mashed potatoes. 

She’s pretty genius, my mother...which I hope I inherited from her too…


Herby Potato Salad

Ingredients:

2 pounds yukon gold potatoes

2 garlic scapes, sliced small

1 tablespoon finely chopped chives

1 tablespoon finely chopped parsley

1 tablespoon finely chopped dill

juice of one lemon

¼ cup olive oil

salt & pepper to taste

Directions:

In a large pot, cover the potatoes with cold water and over high heat bring to a boil. Lower to a simmer, and cook potatoes until very soft when pierced with a fork. Drain the potatoes and rinse under cold running water for a few minutes. Set aside.

Throw all your chopped herbs together in a large bowl. Cut the potatoes into 1 inch chunks and while they’re still a touch warm on the inside, toss them together very gently with the herbs, lemon juice, olive oil and seasoning. Put in fridge to chill for a few hours or overnight. Serve cold.

Like most picnic salads, potato salad is better the next day. And according to my cousin Evelyn, tossing it while warm allows for the flavors to really integrate into the potato chunks and because Evelyn’s potato salad is hella awesome, I have to believe her.

Serve 6 to 8

What I Really Eat: Roasted Rhubarb & Strawberries

"What I really eat" are my Iron Chef meals. My pantry meals. Shit, my fridge is empty meals. The things that come out of necessity and lack of time. The ingredient list will usually be small and the execution usually simple. Something that is less of a recipe and more of a guideline. If something exceptionally awesome comes out of my Sunday night scramble, it will get posted as a “What I Really Eat” and probably be accompanied with a not-my-best photo.

I can’t be the only one who found a hidden half bag of rhubarb in my crisper. I can’t be the only one who bought way too many strawberries and now have the most melty batch ever hanging out in the fridge. I can’t be the only one who thought that even though it didn’t work the first two times, that maybe, maybe this time the recipe would work.

Am I the only one? It’s okay you can tell me.

I had lofty visions. There would be whey protein! And chia seeds! And almond milk! And most importantly the essence of summer in concentrate --- drippy chunks of caramelized, roasted strawberries and rhubarb. Then I would bask in that post yoga glow, drinking summer and recovery in a glass. I tried really, really hard to make the summeriest post workout shake I could. I now have the endless amount of essentially tasteless smoothie servings stacked up in my freezer to prove how hard I tried. Unfortunately for me and my next dozen yoga sessions, it just did not work. Short of using the entire batch of roasted fruit for just one serving, the sweet, puckery strawberry-rhubarb combo just did not translate through the rest of the shake. I guess I thought the flavors would be a bit more shouty. Also, I will admit that if I was trying for shakes not of the protein variety it probably would have worked much better.

On my last attempt I was a bit defeated as I packed up yet another batch bound for the freezer. But since I had resisted in dumping the entire batch of fruit into the blender, the remainder of the day I found myself scooping up spoonfuls of the roasted fruit straight to my mouth. If anything was worth sharing other than my tale of failure, it’s this dead simple recipe for roasted strawberries and rhubarb.

Recipe is obviously a strong word. Regardless, your morning yogurt or after dinner ice cream will be the better for it. I’m feeling wistful that I didn’t think to swirl it into a baked good. It just didn’t last that long.


Roasted Rhubarb & Strawberries

Ingredients:

2 cups rhubarb diced into 1-inch pieces

2 cups strawberries halved

2 to 3 tablespoons turbinado sugar or other sweetener (feel free to add more, I like it tart)

Directions:

Heat oven to 400 degrees.

Line a sheet pan with parchment paper. Spread fruit out across paper. Sprinkle with sweetener and then give it a good toss to coat evenly.

Put in oven until juices have released and fruit is bubbly and caramelized, about 45 minutes. Check at least once, and give it a toss if desired.

Makes approximately 2 cups of roasted fruit.

Winter Slaw

Disclaimer: We are going to pretend I didn’t go MIA yet again last week okay?...I don’t want to talk about it.

Well that went fast. It’s March already? How the hell did that happen? Winter is, dare I say, almost over?

I'm not winter's biggest fan or anything, and yet I’m vaguely sad about it. I’m not sure if it’s just time passing by so quickly that makes me feel wistful or if it’s genuinely the fact that another season has just ticked by. I was really getting in the swing of things for winter cooking. Baking all the squash, eating all the kale salads, living off pears, apples, and citrus. Braising, roasting, soup-making.

The thought of winter cooking terrified me when I was sitting upon heaps and heaps of summer produce (with scarcely an idea of what to do with ALLLLL of it.) I realize now, the abundance of summer produce can be downright overwhelming.

Where as, and I’ve said this before, the limited variety of winter produce has me figuring out how to use the same vegetable in several different, more creative ways. I also look back on past winters when I was always so disappointed with the general lousiness of vegetables. Mealy pink tomatoes, rubbery peppers, miniscule zucchinis, nevermind the tasteless strawberries and costly raspberries -- then seasonal eating went and slapped me upside the head. Um, hello! It ALL makes sense now. Eating locally and seasonally has changed my entire life, and I can say definitively for the better.

So since winter is just about done (although currently in NYC there looks to be no end in sight, i.e. snowing the rest of the week) I’m sharing with you today a Winter Slaw. I lived off this slaw for about a week and it only got better with time. And then I made it again, because it was that good. And before winter yields to spring in a few weeks, I want to make another batch, to toast to the cabbage, and kale, and carrots, and apples. Because even among the grey, dreariness of the season, they made everything a little brighter.


Winter Slaw

Ingredients:

¼ cup white balsamic vinegar or apple cider vinegar

¼ cup olive oil

1 tablespoon maple syrup

1 tablespoon dijon mustard

salt and pepper to taste

1 head red cabbage, shredded thinly

½ bunch kale, chiffonaded

4 carrots, shredded or julienned

1 granny smith apple, shredded or julienned

½ cup golden raisins

Directions:

In a small bowl, mix all dressing ingredients and whisk together until well combined. Set aside.

To assemble slaw, add all prepped vegetables to a large salad bowl and toss together until well mixed.

Pour dressing over vegetables and toss again to coat.

The slaw only gets better with time, taste wise and it turns a very pretty magenta after a day or two in the fridge.

Yield: 10 to 12 servings

Spicy Delicata Hummus

I promised you hummus yesterday.

I give you hummus.

Late. But better late than never.
How convenient that during my mediterranean craving craze I stumble across a recipe for squash hummus on my ever-favorite website: Food52.

I had stumbled across other chickpea-less recipes a long time ago, but I remember them calling for zucchini and that just always seemed to me a possibly very watery alternative.
Using hard squash though, I could see how that would work!

It did not disappoint. I switched up a few things here and there to my tastes, but it’s a pretty PERFECT alternative to traditional hummus. Depending on the flavoring, people won’t even know the difference. (Tested on real live co-workers!)
a revelation

a revelation

Can we just talk for a moment about roasted garlic. I mean, how have I not been doing this...forever. I've heard about it, and I may have actually encountered it that one time when I lived with a chef...but I've decided that it now needs to be something I do on a weekly basis.

Goodness, would you look at that?

Tomorrow, I’ll give you something to schmear it on.


Spicy Delicata Hummus

adapted slightly from this recipe at Food52

Ingredients:

2 pounds delicata squash (2 to 4 squash depending on the size)

1 head garlic (intact)

¼ olive oil plus more for roasting squash and garlic

overflowing ¼ cup tahini

1 chipotle pepper (and a dash of the sauce in the can if so desired)

squeeze of half a lemon

salt and pepper to taste

Directions:

Heat oven to 350 degrees

Slice your squash in half and scrape out the seeds. Drizzle the insides of the squash with olive oil and sprinkle with salt. Place the squash cut side down on a sheet pan and place oven. Roast for approximately one hour or until squash is soft when pierced with a fork.

At the same time you are roasting the squash, slice off about the top ¼ inch of a head of garlic. Grab a piece of aluminum foil and place your head of garlic in the middle. Drizzle the exposed garlic cloves with a bit of olive oil and then wrap up the head in the foil and place in the oven to roast until soft when pierced with a fork. The cloves should look caramelized. This will also take approximately one hour.

Once you’ve removed the squash and garlic from the oven, allow them to sit until they’re cool enough to handle.

Using a blender or food processor, scoop the roasted squash out of it’s skin directly into the blender cup or processor vessel (I used my nutribullet to great success.) Next, squeeze the garlic cloves out of their skins as well and into the vessel. You should be able to just pinch the bottom and they’ll sort of ooze out.

Add the remaining ingredients, and then blitz until everything is fully combined. Scrape out into a bowl. Taste for seasoning and adjust as necessary. Cover with plastic wrap and refrigerate for at least three hours before serving.

Serve with whatever you please! I snuck some warmed pita, and also schmeared it all over cauliflower falafels.

Makes about 2 cups

Cauliflower Tabbouleh

And so I declare this Mediterranean week here in the sizzle & sass kitchen!

It hit me like a ton of bricks about three weeks ago. I could think of nothing else but warm pita, falafels, tabbouleh, and hummus for straight up days. Conveniently this craving struck during the high holidays, meaning, that the Mediterranean place near my job was closed in observance several times.

It got me thinking though as I was finally inhaling still hot from the fryer falafels one day that hmm, I wonder if I could paleo-fy these? Oh and maybe hummus!….AND MAYBE TABBOULEH!

Can we just straight talk for a second? I just want to say that I use paleo as a framework for how I eat day to day. I am not so strict about eating that way 100% of the time. One of the best parts for me has been expanding how I think about food and the way it can be used. It helps me get creative! I'm actually working on re-writing my about me to reflect these thoughts. The "buzzwords" in there have always killed me a little bit. So, anyways, while I am pretty positive some chickpeas once in a while ain’t gonna kill me, having the revelation (which I’m sure is not so original) that cauliflower riced to couscous size could work as chickpeas. I mean come on! I had to try it.

So for the people that do follow strict paleo for whatever reasons and are missing dearly those crunchy, herby, lovely balls of chickpeas, and smooth yummy hummus and refreshingly delicious tabbouleh…I did my best to find applicable substitutions, and I have filed these recipes under SUCCESS.

Today I give you tabbouleh! Hummus and falafels will be posted later this week.

One note about this tabbouleh. Mine looks a teensy bit on the brown side.

You see, what had happened was…

Listen, I don’t think you will have half as many things going on in your oven as I did the day I made this. So you probably won’t be switching pans around to different places in oven and you probably won’t stupidly place your roasting riced cauliflower on the very bottom of the oven and then shut the door and then discover it about five minutes too late when you go to switch things around again.

You will roast this until it's just perfectly tender and just a smidgen toasty on the edges.

Got it? Great.


Cauliflower Tabbouleh

2 cups of cauliflower, riced in a food processor (about the size of couscous)

1 cup of diced tomatoes

½ cup of parsley, finely chopped

½ cup of mint, finely chopped

approximately ¼ cup of olive oil

juice of 1 lemon

salt and pepper to taste

Heat oven to 350 degrees

Line a sheet pan with parchment paper and spread your riced cauliflower on the pan.

Roast in oven until tender and slightly toasty on the edges, approximately 15 to 20 minutes.

Place in bowl and let cool to room temperature.

Once cooled, add the tomatoes and herbs to the bowl and then dress with olive oil and lemon juice and add seasoning, stir to combine all ingredients. Adjust seasoning as needed.

Tabbouleh is one of the those feel it out type of salads. My mother’s ratio is more bulgar wheat to herbs and then she sorta continues to taste it and add in the oil, lemon, and salt and pepper until it tastes right. This is essentially her recipe with the bulgar switched out for cauliflower.

Roasted Strawberry Balsamic Glaze

 There was a point this summer where I was up to my damn eyeballs in strawberries.

My mother and I went strawberry picking at a local farm in Connecticut and we picked 30 pounds of berries. 30 POUNDS! Oops! 

We made a ton of jam, we made loads of shortcake, and we gave a bunch away to friends. And we still had strawberries.

The thing with strawberries though is, they last all of two seconds, and then they start to wither and wrinkle and generally mold over. Especially the kind you freshly pick. They’re just not built to withstand cross country shipping like their sturdier grocery store counterparts.

So we had to start thinking of creative ways to use them.

This recipe is one I came up with that weekend I was buried in berries.

It’s an interesting thing cooking with the seasons. I was sad since I didn’t have my shit together enough in June to get many strawberry recipes in and up on this here blog thing. But, I’m posting it now, since I’ve realized that you can still get strawberries locally here and there at the markets. Even if they’re suspicious ones.

This glaze is ridiculously easy to do, I feel bad even calling it a recipe. But my mother and a friend could not get over how much they enjoyed it.

Please don’t judge me and my lack of steak cooking skills. I’m not big on the whole “rare” steak thing and I’m sure this is a touch overcooked for many steak connoisseurs. None the less, this glaze was tasty and that’s what I’m really selling here. So cook those steaks (or chicken, or pork or whatever!) to perfection and then smother it in this sauce. I hope you won’t be disappointed. We definitely weren’t.


Roasted Strawberry Balsamic Glaze

Ingredients:

1 cup strawberries, halved

1 cup balsamic vinegar

Directions:

Heat oven to 350 degrees.

Place vinegar in a small saucepan and bring to a boil. Reduce heat to low and let vinegar reduce by half, until thick and syrupy. About 30 to 40 minutes.

While vinegar is reducing, spread out the halved strawberries on a sheet pan. Roast at 350 until soft and juicy. Approximately 20 to 30 minutes.

Transfer your cooked berries to a bowl and then either mash them well with a fork or for a super smooth sauce ---- use a blender, food processor, or an emulsifier.

Depending on the timing, your balsamic vinegar should be reduced by now.

Take off the heat and pour into a serving bowl if you wish or just leave in pan. Take your berry sauce and mix into vinegar reduction.

Use as a glaze for any meat. I used it with steak!

Yield: approximately 1 cup of sauce