What I Really Eat: End of Summer Peach Compote

"What I really eat" are my Iron Chef meals. My pantry meals. Shit, my fridge is empty meals. The things that come out of necessity and lack of time. The ingredient list will usually be small and the execution usually simple. Something that is less of a recipe and more of a guideline. If something exceptionally awesome comes out of my Sunday night scramble, it will get posted as a “What I Really Eat” and probably be accompanied with a not-my-best photo.

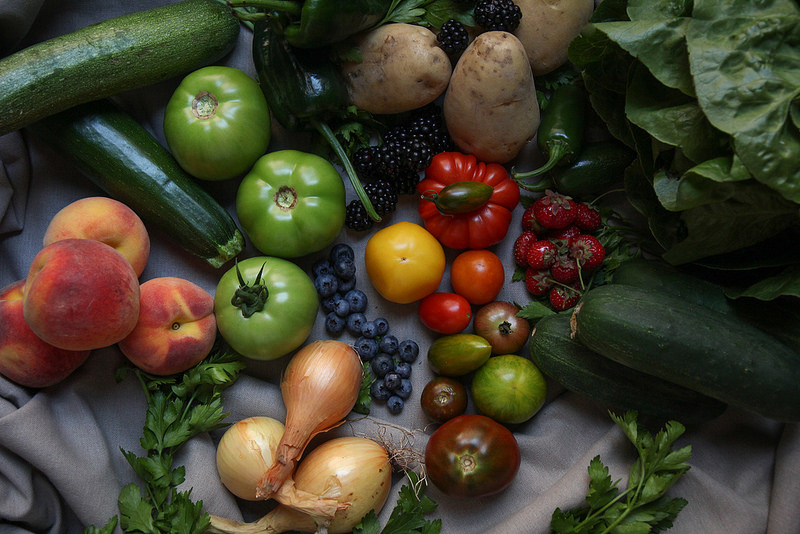
It happens to the best of us. You get cocky. You take it for granted and you don’t realize that the last peach you ate, that last really great peach, was going to be the last great one of the season. If you had known, you probably would have savored it just a little bit more, made it last just a little bit longer. But alas, that is life.

I get it. You’re at the farmers’ market and you’re like: psh...it’s almost October? Whatever! Look at all these bins of peaches, they have to be good, right? WRONG. It’s now the time to play end of summer peach roulette. Could get a great one! Could get six really terrible ones.

As I bit into a farmers’ market peach the other night (one of half a dozen I had brazenly brought home), I came to the stark realization that summer might really be over, and therefore eating really great peaches along with it. My peach was mealy and chalky and tasteless. I swear I almost cried. Boyfriend looked over at me and said, “what’s wrong?”, as my shoulders fell and I probably looked like someone had just kicked the cat, and then I spit my bite of peach into the garbage with defeat.

There I was though, half a dozen deep in shitty end of summer peaches that nevertheless pained me to leave to the fruit flies. So I fell back on a mantra that has gotten me through many a questionable situation: When in doubt, make compote

Would cooking these mealy, lackluster things with a little bit of sugar and some lemon juice and maybe a cinnamon stick save them?

The answer was yes.


End of Summer Peach Compote

Ingredients:

5 to 6 peaches, pitted, peeled and roughly chopped

¼ cup raw sugar or other sweetener (or to taste)

juice of half a lemon

one whole cinnamon stick (optional)

Directions:

In a small saucepan over medium heat, bring all ingredients to a light boil, stirring as needed. Lower heat to a simmer and let compote cook down, stirring occasionally for about 30 minutes or until fruit has cooked to desired consistency. Remove cinnamon stick to serve.

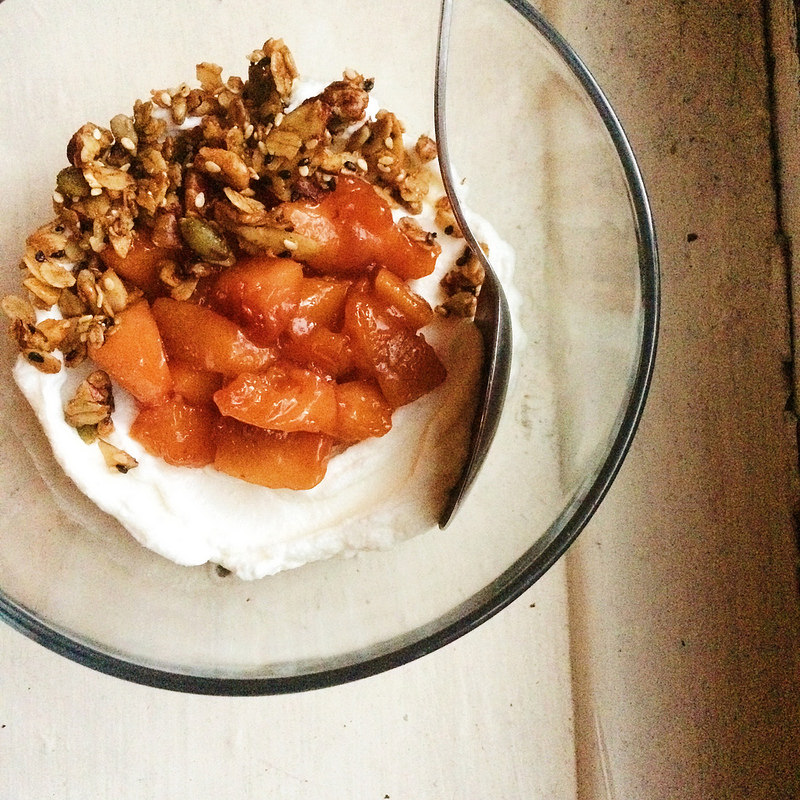
Compote freezes well, if you, like me, have an obsession with saving some summer for later. I plan to swirl it into yogurt with homemade granola (via dash and bella) for the rest of the week. It would be at home on toast or ice cream or waffles or pancakes as well. Just sayin.

Makes about 1 ½  cups of peach compote.

What I Really Eat: Saucy Zucchini & Tomatoes

"What I really eat" are my Iron Chef meals. My pantry meals. Shit, my fridge is empty meals. The things that come out of necessity and lack of time. The ingredient list will usually be small and the execution usually simple. Something that is less of a recipe and more of a guideline. If something exceptionally awesome comes out of my Sunday night scramble, it will get posted as a “What I Really Eat” and probably be accompanied with a not-my-best photo.

A less inspired person might look in their fridge and on their counter and see but a single languishing green squash and some dying baby heirloom tomatoes. But me? I saw dinner.

Summer, at times, forces me to become a partaker of the clean out the fridge meal. And typically I emerge a champion on the other side, with a quick dinner and extras for the freezer to boot.

What started as a cross-my-fingers-hope-this-tastes-good endeavor became one of my favorite summer dinners to date. And my boyfriend deemed it one of the meals that defines my cooking style --- homey, comforting, saucy and made of out nothing. He stirred it into some freshly scrambled eggs as he said this. I opted to plop it into some brown rice, and because “treat yo’ self” --- melted a bit of shredded mozzarella on top.

Over the next couple days, most found its way to the freezer for when I’m sad in January and I want a taste of summer. But just so I could show you what I did, I swirled some into brown rice pasta and then had a very good Saturday lunch.

saucyzukeandtom2.jpg

What I Really Eat: Saucy Zucchini & Tomatoes

Ingredients:

olive oil

2 cups zucchini, diced

2 cloves garlic, minced

2 cups tomatoes, diced

1 tablespoon tomato paste

1 cup chicken stock

1 teaspoon red pepper flakes

salt & pepper to taste

a touch of butter

¼ cup parmesan, shredded or grated

Directions:

Splash a bit of olive oil into the bottom of a medium sized pan over medium heat. Add diced zucchini to the pan and stir to coat in olive oil. Let the squash cook for about five minutes on its own, then make a well in the middle of the pan and add the garlic. Stir in garlic and let it become fragrant, about 30 seconds, then add the tomatoes. Stir to combine. Add the tomato paste to the pan and stir to coat all the vegetables. Keep stirring the tomato paste into the vegetables and let it begin to brown on the bottom of the pan for a minute or so. Then add the chicken stock and deglaze the pan, using your cooking utensil to scrape up the browned bits on the bottom of the pan. Add the red pepper flakes and season with salt and pepper. Let this mixture simmer until reduced by half and zucchini is nice and soft. Before turning off the heat, stir in a touch of butter and the parmesan cheese to combine. Taste and adjust seasoning if needed.

Stir into all the things.

Makes about 2 cups of saucy vegetables.

Foraged Berry Butter Sauce

There was a day, deep, deep in January when it was probably too cold to be outside and all the vegetables were likely frostbitten and I was at the farmers’ market anyways. I believe I’ve told you about this before, but I will set the scene once again for the sake of this recipe’s story.

I was bundled up like it was the arctic, which I will maintain that New York basically is in the winter. The weary vegetables I had in my bag were few and mostly neutral in color. There were no bright reds, or deep blues, or vivid greens of summer. The sun was shining and it was bright, but only because of the reflection off the three feet of snow on the ground from the day before's storm. But still, I was there, a winter warrior.

Then I stumbled across the cozy stand that is Beth’s Farm Kitchen. Steam rose from a giant pot of soup. Grilled cheese with jam sizzled on a skillet. All of it was too enticing to pass up. So I sidled on over and tried pretty much every type of jam they had. Because, me.

Black Raspberry Jam, though, is where it all ended. The black raspberry brought me instantaneously back to mid-July summers in Connecticut.

This is where we go back even further, back to dreamy Connecticut childhood times where I would trot around barefoot (bee stings be damned) with a colander or sometimes just my hands and pick wild black raspberries and gooseberries from all over my yard. If I hadn’t eaten all of the ones I had picked, I’d bring them to my mother, who would make a simple yellow cake that she doesn’t even have a recipe written down for. Then she would take half a stick of ice cold salted butter and mash it up with a touch of sugar and the black raspberries I had brought her, just like her mother did before her. Yes, you read that right, cold butter. Stay with me.

She would then pour this berry butter sauce all over the fresh out-the-oven cake and I mean, it’s just the epitome of summer. Weird sounding it may be, a Mama Lunetta summer classic it is. It’s magical; butter just has a way of doing that to things. You will understand its sorcery when you try it, which I have to insist that you do. 

Just trust me.

Early Monday morning this past visit home, I was hurriedly packing to make the train back to the city and true to my mother’s nature, she went around the yard and picked a fresh batch of berries and tucked them into one of my bags when I wasn’t looking. I found them when I got to work and immediately knew their destiny...

berriesandpancakes.jpg

Foraged Berry Butter Sauce

Ingredients:

1 heaping cup of wild black raspberries

2 to 3 tablespoons raw sugar (or other sweetener)

4 tablespoons cold salted butter

Directions:

In a medium sized bowl, mash together the berries, sugar, and the cold butter. It’s best to use something like a pastry cutter to potato masher.

Mash until the berries have become soupy and mostly smashed and butter is dispersed throughout in very tiny chunks.

Pour over plain white cake. Or waffles. Or pancakes. But make sure to keep cold until using and then pour over something warm. That’s where the magic happens.

I haven’t ever done it with other types of berries, but this combination won’t be amiss with other components --- red raspberries or blackberries would fair well with more sugar, strawberries would be delicious, blueberries would be great.

The pancakes from the pictures are just these pancakes sans strawberries.

Makes about 1 cup of cold butter berry sauce.

pancakescutout.jpg

What I Really Eat: Roasted Rhubarb & Strawberries

"What I really eat" are my Iron Chef meals. My pantry meals. Shit, my fridge is empty meals. The things that come out of necessity and lack of time. The ingredient list will usually be small and the execution usually simple. Something that is less of a recipe and more of a guideline. If something exceptionally awesome comes out of my Sunday night scramble, it will get posted as a “What I Really Eat” and probably be accompanied with a not-my-best photo.

I can’t be the only one who found a hidden half bag of rhubarb in my crisper. I can’t be the only one who bought way too many strawberries and now have the most melty batch ever hanging out in the fridge. I can’t be the only one who thought that even though it didn’t work the first two times, that maybe, maybe this time the recipe would work.

Am I the only one? It’s okay you can tell me.

I had lofty visions. There would be whey protein! And chia seeds! And almond milk! And most importantly the essence of summer in concentrate --- drippy chunks of caramelized, roasted strawberries and rhubarb. Then I would bask in that post yoga glow, drinking summer and recovery in a glass. I tried really, really hard to make the summeriest post workout shake I could. I now have the endless amount of essentially tasteless smoothie servings stacked up in my freezer to prove how hard I tried. Unfortunately for me and my next dozen yoga sessions, it just did not work. Short of using the entire batch of roasted fruit for just one serving, the sweet, puckery strawberry-rhubarb combo just did not translate through the rest of the shake. I guess I thought the flavors would be a bit more shouty. Also, I will admit that if I was trying for shakes not of the protein variety it probably would have worked much better.

On my last attempt I was a bit defeated as I packed up yet another batch bound for the freezer. But since I had resisted in dumping the entire batch of fruit into the blender, the remainder of the day I found myself scooping up spoonfuls of the roasted fruit straight to my mouth. If anything was worth sharing other than my tale of failure, it’s this dead simple recipe for roasted strawberries and rhubarb.

Recipe is obviously a strong word. Regardless, your morning yogurt or after dinner ice cream will be the better for it. I’m feeling wistful that I didn’t think to swirl it into a baked good. It just didn’t last that long.


Roasted Rhubarb & Strawberries

Ingredients:

2 cups rhubarb diced into 1-inch pieces

2 cups strawberries halved

2 to 3 tablespoons turbinado sugar or other sweetener (feel free to add more, I like it tart)

Directions:

Heat oven to 400 degrees.

Line a sheet pan with parchment paper. Spread fruit out across paper. Sprinkle with sweetener and then give it a good toss to coat evenly.

Put in oven until juices have released and fruit is bubbly and caramelized, about 45 minutes. Check at least once, and give it a toss if desired.

Makes approximately 2 cups of roasted fruit.

Green Goddess Dressing

So you bought a bunch of garlic scapes. Now what?

Um, I have no idea…I’m in the same boat! Oops. It seems that garlic scapes are rarely the star of the show. I want to believe they’re okay with that, because I’ve mostly been blending them into things. A lot of suggestions for scapes are to make pesto, but I’ve already done that. I’ve read that you can pickle them and then they actually taste a bit like green beans?…Weird, right? Lest we forget last summer when I made this frittata with them and I burned the shit out of it. It was great regardless of the burning, and I made it again, not burnt, and it was still great. Maybe I should take a new photo. I also added them to a lot of veggie stir-frys. They keep really well wrapped up in the crisper. So, basically what I’m saying is, help! Any ideas for garlic scapes, send them my way! (I fully understand that I should probably be the one telling you what to do with them...see below for some of that.)

This green goddess dressing has been pinned to my Food52 collection board for awhile now and as I was desperately trying to come up with ways to use up these garlic scapes, it came to mind. I could easily swap out the garlic for some slinky green scapes. They would for sure add to the “green” in “green goddess dressing”. It also reminded me that lurking deep in the back of one of my cabinets, was a small tin of anchovies that I bought in a moment of fierce courage even though I had no plan for them yet. I felt accomplished as a I placed them in my basket, as though I had made it through a foodie rite of passage. I knew that people sing their praises as umami filled flavor boosters --- they just make everything taste better. But then they went up into a cabinet for a few months to be forgotten/avoided because I needed an excuse for another fierce moment of courage. Green Goddess dressing it was!

As a fish-phobic individual, I had my doubts of their apparent flavor magic and was convinced that upon tasting the dressing I would immediately know that anchovies were present and decide, no thank you. Opening the can, I prepared to be walloped in face by FISH. But no, that wasn’t the case. I took the little critters and quickly diced them up and threw them in with the other ingredients and they looked just like little bacon bits. They had finally met their destiny, or I guess two of them had, because shit I have a whole can of anchovies to use up...now what?

I was not brave enough to slurp up one on its own. But I think I will continue to mush them into things and pretend they’re not there, enjoying the punchiness I’m assured they lend to dishes. Take it from me, anchovy-phobes, it’s probably time. Time to use up some of those garlic scapes and those little fishies hiding in your cupboard to make this dreamy dressing.

You’ll want to dunk all of the raw vegetables in it, spread it on all of the sandwiches, possibly bathe in it and emerge like the summery goddess we are all becoming with this warm, veggie-friendly weather. I’m dreaming of tomatoes sitting in puddles of it, their insides oozing out and scooping up all that goodness with a spoon. I thought it wouldn’t be half bad as a dressing for chicken salad. Dolloped on raw baby carrots and snap peas was a pretty good start.


Green Goddess Dressing

adapted from this Food 52 recipe

Ingredients:

½ of a ripe avocado

3 tablespoons white wine vinegar

3 garlic scapes diced small

2 oil packed anchovies, finely chopped

¼ teaspoon honey

2 teaspoons fresh lemon juice

½ cup olive oil, add a bit additional if needed

¼ cup buttermilk (can sub heavy cream)

3 tablespoons chopped fresh parsley

2 tablespoons chopped fresh carrot greens

2 tablespoons chopped fresh tarragon

salt & pepper to taste

Directions:

Add avocado, vinegar, garlic scapes, anchovies, honey and lemon juice into a blender. Blitz until all is combined. Since I have a nutribullet, I added all of the olive oil at this point and blitzed until fully incorporated. If you have a regular blender, with the top on, run the blender at a low speed and slowly drizzle the olive oil in through the hole in the top. Blitz until incorporated.

Transfer this mixture to a medium sized bowl. Whisk in the buttermilk.

Whisk in the chopped herbs next. Season dressing to taste.

Best after chilled for a few hours, however let it sit for a few minutes at first for the oil to come back to its liquid state.

Makes about 1 ½ cups. Keeps for about 3 days.

Carrot Top Garlic Scape Pesto

I’m not exactly sure what to say about pesto. Because I’ve felt deeply for most of my adult life, that no, I do not like pesto. But now what I realize I actually don’t like is, I think, basil.

Something possessed me this past farmer’s market to pick up a bunch of baby carrots. It wasn’t a hard sell, they were ridiculously adorable looking and came with a bunch of fluffy green tops and they just screamed SPRING! and HEALTH! I had it in mind to use up last haul’s dill weed up by making this from the archives.

Not sure if you know this, but it’s pretty trendy these days to be a Dan Barber fan-girl. If you don’t know him, he is one of the poster boys for the sustainable food movement. One of his more recent ventures was turning his fancy Manhattan restaurant into a pop-up called wastED to bring attention to food waste. It was already a farm to table establishment, garnering most of its ingredients from Barber’s upstate and New England working farms. So basically he’s running for sainthood. You should check out his "Chef’s Table" episode on Netflix so we can all be fan-girls together. When does the pesto come in? I’m getting to that. 

Between him and resident cool girl, April Bloomfield, whose “top to tail” and “nose to tail” cooking has also inspired many a food waster to cut down. The recent author of “A Girl and Her Greens”, has lately had her roasted carrots with carrot top pesto making the internet rounds. So to state the obvious and get to the pesto, as I was shearing the greens from my baby carrots, I choose not to throw those greens out, but whirled them together with some usual pesto suspects.

It doesn’t taste like the pesto you know, because as noted above, I probably wouldn’t like it. But it’s herby and salty and lipsmackingly slick with olive oil as any good pesto probably should be. Since I used farmer’s market darling, the garlic scape instead of garlic, you can sub in two garlic cloves if you can’t find those.

I’m a total pesto convert, I’ve basically put it on and in everything this whole week. I even started dipping baby carrots in it, it seemed wrong...but also right...


Carrot Top Garlic Scape Pesto

adapted from “A Girl and her Greens”

Ingredients:

2 cups packed roughly chopped carrot tops

3 garlic scapes roughly chopped (can sub 2 cloves smashed garlic)

salt and pepper

¼ cup packed grated parmesan

¼ cup toasted pine nuts

½ cup olive oil

Directions:

I made mine in my nutribullet, so I just dumped it all in the large vessel and let it do it’s blending thing.

If you are using a food processor, you are going to want to lightly pulse all the ingredients except for the olive oil until mostly combined. Then set it to process on a low setting and slowly pour the olive oil in through the opening of the top of the processor, blitzing just until it comes together.

Use on and in everything.

Store in the refrigerator in an air tight container with a light layer of olive oil on the top. It also freezes well.

Makes about 1 cup

Note: A few days later I smothered some grilled vegetables in this pesto and topped it all with burrata. Recipe here.

Spicy Delicata Hummus

I promised you hummus yesterday.

I give you hummus.

Late. But better late than never.

How convenient that during my mediterranean craving craze I stumble across a recipe for squash hummus on my ever-favorite website: Food52.

I had stumbled across other chickpea-less recipes a long time ago, but I remember them calling for zucchini and that just always seemed to me a possibly very watery alternative.

Using hard squash though, I could see how that would work!

It did not disappoint. I switched up a few things here and there to my tastes, but it’s a pretty PERFECT alternative to traditional hummus. Depending on the flavoring, people won’t even know the difference. (Tested on real live co-workers!)

a revelation

a revelation

Can we just talk for a moment about roasted garlic. I mean, how have I not been doing this...forever. I've heard about it, and I may have actually encountered it that one time when I lived with a chef...but I've decided that it now needs to be something I do on a weekly basis.

Goodness, would you look at that?

Tomorrow, I’ll give you something to schmear it on.


Spicy Delicata Hummus

adapted slightly from this recipe at Food52

Ingredients:

2 pounds delicata squash (2 to 4 squash depending on the size)

1 head garlic (intact)

¼ olive oil plus more for roasting squash and garlic

overflowing ¼ cup tahini

1 chipotle pepper (and a dash of the sauce in the can if so desired)

squeeze of half a lemon

salt and pepper to taste

Directions:

Heat oven to 350 degrees

Slice your squash in half and scrape out the seeds. Drizzle the insides of the squash with olive oil and sprinkle with salt. Place the squash cut side down on a sheet pan and place oven. Roast for approximately one hour or until squash is soft when pierced with a fork.

At the same time you are roasting the squash, slice off about the top ¼ inch of a head of garlic. Grab a piece of aluminum foil and place your head of garlic in the middle. Drizzle the exposed garlic cloves with a bit of olive oil and then wrap up the head in the foil and place in the oven to roast until soft when pierced with a fork. The cloves should look caramelized. This will also take approximately one hour.

Once you’ve removed the squash and garlic from the oven, allow them to sit until they’re cool enough to handle.

Using a blender or food processor, scoop the roasted squash out of it’s skin directly into the blender cup or processor vessel (I used my nutribullet to great success.) Next, squeeze the garlic cloves out of their skins as well and into the vessel. You should be able to just pinch the bottom and they’ll sort of ooze out.

Add the remaining ingredients, and then blitz until everything is fully combined. Scrape out into a bowl. Taste for seasoning and adjust as necessary. Cover with plastic wrap and refrigerate for at least three hours before serving.

Serve with whatever you please! I snuck some warmed pita, and also schmeared it all over cauliflower falafels.

Makes about 2 cups

Chicken Enchilada Casserole

This casserole was the win of my weekend.

I had a blog-cooking-extravaganza a couple weekends ago in preparation for my time away. So after a lot of cooking and several recipe test fails, I was at my wit's end and about to call it quits. This was one of my final tests, and I had no clue if it was gonna work out and if it hadn’t, I’m not sure I would of handled it well. Even before that, this was a re-route from an original plan because as mentioned on Monday, cauliflower was no where to be found.

I mean seriously, at one point there was glass and coffeecake all over my kitchen floor.

I am now loaf pan-less and you are now coffeecake-less.

But. YES. YES. YES. This casserole worked. And it completely made up for those few fails that occurred.

That stain is never gonna come out.

That stain is never gonna come out.

I think that removing the eggplant skin is key and having a mandoline definitely makes things easier. I was able to get super thin slices of eggplant that truly resembled tortilla-like layers. The directions of course look excessive, but I promise it took me no longer than the thirty minutes it takes for the eggplants to sweat to get the other two components together, and assembling shouldn’t take more than five.


Chicken Enchilada Casserole

Ingredients:

Casserole

1 large eggplant, skin removed and sliced thinly lengthwise (my mandoline made quick work of this --- the aim is to make these work like tortillas or lasagna sheets would), total of 12 big slices (you may have a few extra smaller slices, roast those babies up, if you please!)

salt (for sweating the eggplant)

Chicken filling (ingredient list below)

Enchilada Sauce (ingredient list below)

2 cups of shredded cheddar cheese

Chicken filling

splash of olive oil

1 small onion, diced

1 small tomato, roughly chopped

1 sweet pepper, diced

1 jalapeno, minced

2 chicken breasts, cooked and shredded

½ teaspoon garlic powder

½ teaspoon cayenne

1 teaspoon cumin

1 teaspoon paprika

salt and pepper to taste

Enchilada Sauce

splash of olive oil

1 small onion, diced

1 garlic clove, minced

4 medium tomatoes, roughly chopped, approximately 2 cups

2 tablespoons chili powder

1 teaspoon paprika

¼ teaspoon oregano

¼ teaspoon cumin

¼ cup shredded cheddar cheese

salt and pepper to taste

Directions:

First things first, get your eggplant slices sweating by laying them on a flat surface and sprinkling them with a bit of salt and letting them rest for approximately 30 minutes.

While the eggplants sweat, get the olive oil heating in medium pan over medium heat. Add the onions, tomato, pepper, and jalapeno to the pan. Cook until onions and peppers are soft and tomato is wrinkly. Add the chicken to the pan and stir to combine the ingredients. Add in the spices and stir in to incorporate. Season with salt and pepper to taste. Remove from heat.

For the enchilada sauce, get a splash of olive oil heating in a small sauce pan over a medium heat. Add in the onion, garlic, and tomatoes and cook until the onion is soft and translucent and the tomatoes are starting to break down. Add the chili powder, paprika, oregano, and cumin. Stir in spices well. Continue to cook until the tomatoes have broken down completely and it’s starting to resemble a sauce, approximately another 10 minutes. Stir in the cheddar cheese. Once the cheese has completely melted into the sauce, taste for seasoning and then remove from heat. Optional move: once it's cooled a little, blitz the sauce with a hand blender or regular blender for a super smooth sauce.

If you’re a real awesome pro, you can attempt to do the filling and sauce at the same time.

Heat oven to 350 degrees.

Using an 8x8 inch square baking dish, prepare to assemble the casserole.

With a paper towel, dab off the “sweat” from the eggplant slices.

Spread about a tablespoon or so of the enchilada sauce on the bottom of the baking dish. Next add the first layer of 3 eggplant slices, they can overlap slightly. Take about ⅓ of the chicken filling and spread it on top of the eggplant, then spoon on about ¼ of the enchilada sauce and lastly sprinkle on some of the cheese. Layer on 3 more eggplant, then start again with the chicken, the sauce and the cheese. You’ll do this for a third time, and then top with the last layer of eggplant, use the last of the sauce on top of the eggplant and sprinkle on the remaining cheese and then place in oven for about 40 minutes until the cheese is golden and bubbly and the eggplant is tender.

Serves 4 to 6