Pulled Pork with Chipotle Barbecue Sauce
/
First things first, I need to get this off my chest ---- it’s really hard to make a pile of meat look photogenic.
There. I said it.
Moving on.

A big beautiful brioche bun, toasted, might have made this a little more fantastic looking, but we don’t do buns too often here in the sizzle & sass kitchen. A side of slaw though, I believe is, requisite. Spicy Slaw would have been great here, but I was unfortunately jalapeno-less. (It went into something awesome destined for the internets sometime next week.)
But let’s talk about the here and now. Pulled Pork and Chipotle Barbecue Sauce.
Normally I would have done this with a pork shoulder. But my mother had given me half of a 9 pound pork loin she’d bought. I needed to use it ASAP, since I’d been keeping it in the freezer at work, but then it got kicked out. And because, as previously mentioned, I’ve been desperately filling my freezer with summery goodies getting ready for my winter hibernation, I had ZERO space left for 5 pounds of pig.

So pulled pork it was! Even at the end of August when summer definitely decided to make a comeback and pulled pork meant that my oven had to be on for like five straight hours. Despite the heat it produced, it was worth it. Pulled pork is always worth it.

The barbecue sauce was one of those things where I surprised even myself. I went completely off track with it, and didn’t bank on it turning out necessarily well. Probably well enough for me and the partner in crime to eat, but not necessarily good enough to post about.
Well, if that wasn’t further from the truth. So, there are a lack of pictures of the sauce undertaking but who cares, make this sauce. I adapted it like crazy from my lovely, amazing, and best chef friend who’s blog you can read here and recipe you can find here.

I wanted to get it as clean and paleo-esque as possible. So I switched out the ketchup and the brown sugar, and ditched a few other things and adapted to what I had available, hence the chicken stock substitution. But Sean’s original recipe was a great starting point, including the fact that it has coffee in it which ties into the pulled pork recipe as well as ties into my life as a complete and total coffee addict.

For that super simple slaw pictured, I just slivered up some red and green cabbage, red onion and some bell pepper and tossed it in the dressing that I used for my Slightly Spicy Slaw.
Pulled Pork
Ingredients:
5 pound pork loin or shoulder or butt
2 tablespoons salt
¼ teaspoon ground black pepper
1 tablespoon cumin
1 tablespoon paprika
1 tablespoon garlic powder
1 tablespoon cayenne
1 teaspoon oregano
1 tablespoon olive oil
3 tablespoons maple syrup
1 teaspoon apple cider vinegar
3 to 4 smashed garlic cloves
1 cup freshly brewed black coffee (or other liquid -- I’ve done this with beer, water, orange juice -- sugary stuff burns off though and quickly, if using, make sure to keep basting and adding liquid when it cooks off)
Directions:
Heat oven to 350 degrees
Prep your meat as needed, remove the skin if there is any on it and then place it fat side down in your baking dish. I used my 5.5 quart dutch oven and it worked beautifully in keeping the meat covered when needed and moist. Set aside meat and prepare the spice rub.
In a small bowl, mix salt, pepper, cumin, paprika, garlic powder, cayenne, oregano, olive oil, maple syrup, and vinegar well until fully incorporated. Rub this all over the pork, getting into all the nooks and crannies.
Throw the smashed garlic into the bottom of the pan and then pour in the coffee.
Put into the oven covered, basting occasionally for at least four hours or until a fork easily pierces the meat and looks shreddable. About 2 and half hours in you can remove the cover so that the pork will develop a nice crust. Allow the pork to rest approximately 20 minutes before shredding. I also recommend straining out the braising liquid and reserving to pour over the shredded meat.
You can toss with Chipotle Barbecue Sauce (recipe follows) or any barbecue sauce, but it has more than enough flavor to be eaten on its own..
Yield: approximately 2 quarts of meat
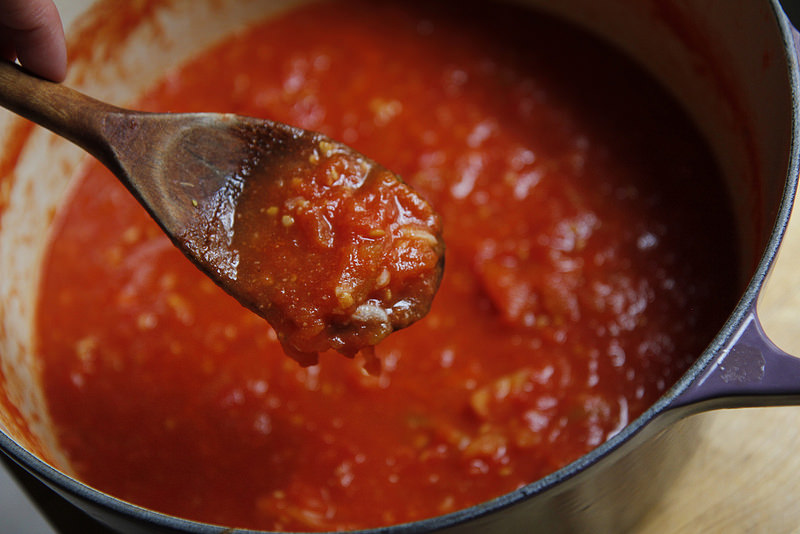
Chipotle Barbecue Sauce
adapted from this recipe over at Home Grown Meals
Ingredients:
splash of olive oil
1 small onion, minced
4 cloves garlic, minced
2 chipotle peppers (from a can), minced
1 tablespoon of the chipotle sauce that’s in the can with the peppers
1 ½ cups chicken stock
½ can of tomato paste
1 cup freshly brewed black coffee
1 cup apple cider vinegar
1 cup maple syrup
2 tablespoons mustard
1 tablespoon oregano
1 tablespoon paprika
Directions:
The barbecue sauce takes about one hour to be ready so you can do ahead of time or to have ready with pork start about halfway through it’s total cooking time.
Get the olive oil heating in a medium sized saute pan over a medium heat and then throw in the minced onion. Cook until soft, translucent, and a touch caramelized. I like using a saute pan for this because it has more surface area and it takes less time to reduce down to a thick sauce.
While the onion cooks down, in a bowl whisk together the coffee, vinegar, syrup, mustard, oregano and paprika. Set aside.
Add the garlic and chipotles to the pan with the onions. Stir in until fragrant and then add the chicken stock, tomato paste and stir to incorporate. Let this mixture cook until it’s thickened slightly, 3 to 5 minutes.
Add the coffee-vinegar mix to the pan and stir to combine. Let the sauce come to a boil then turn down heat to a simmer, stirring occasionally. Sauce will take about 30 to 45 minutes to reduce down and come to desired consistency.
Optional move here at the end: I blitzed mine with a hand blender so it would be super smooth. You can do this, or let it cool a bit and do it with a regular blender. It's also not that chunky at all depending on how small you cut your onions and garlic. Choice is yours, my friends.
Yield: approximately 2 cups