First of Summer Salad with Herby Manchego Dressing

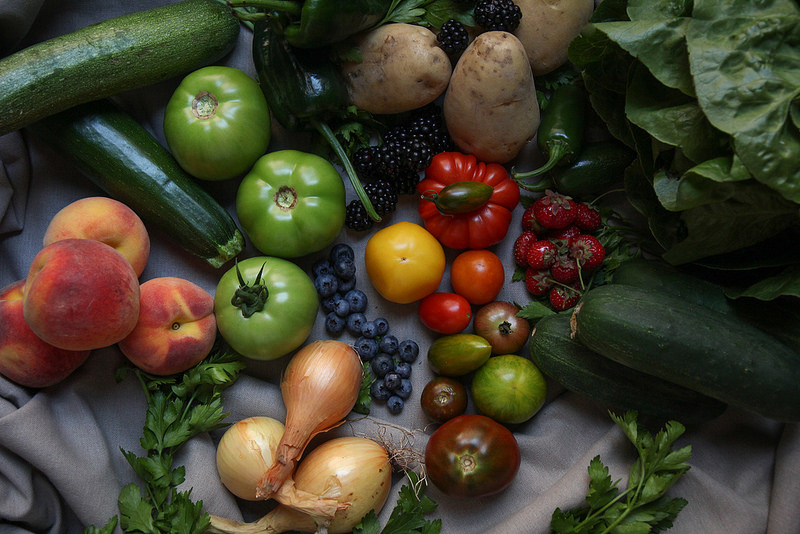
The radicchio I picked up three weeks ago, and by some miracle it looked just as perfect three weeks old as it did when first I gaped over it at the farmer’s market. The manchego I got two weeks ago, when I was visiting my mother and had lofty visions of using it with strawberries in some way. The herbs were leftover, as bunches of herbs usually are, from a different salad to debut someday soon. The first of the season corn and tomatoes found their way into my bag for less mysterious reasons --- I just could not leave the farmers’ market without them, obviously.

This was a made-on-a-whim salad, a caprice salad, if you will (I just learned that word and had to use it). All its components were gathered at separate times. Nothing about this salad was planned. It actually came about because some plans fell through. And in a moment of fierce Saturday night laze we decided to order a pizza.

As a person who grew up with a salad on the side for dinner every night, I naturally wanted to balance the pizza with a big bowl of veggies. I peeked into the fridge and suddenly all these random purchases fortuitously came together in a brief wave of brilliance.

It came about much in the way a Kitchen Sink Salad comes together. You look in the fridge and go “what of these things need to get used up now, fast.” Kitchen sink salads are pretty miraculous because in a sense they shouldn’t work at all. You cross your fingers and hope it works.

But this salad, this is no Kitchen Sink Salad. It’s too composed and perfectly compatible. I firmly believe that this salad was meant to be. That I had bought all these ingredients knowing that one day weeks later I would look in the fridge and be their matchmaker.

The sweet juicy tomatoes and fresh raw corn are the perfect foil to the bitter nip of radicchio. The manchego dressing delivers a rich needed punch to a salad so virtuous. The herbs keep things seeming summer light. And as always, sunflower seeds for crunch. I feel like this would make a delightful panzanella if you’re into that kinda thing.  


First of Summer Salad with Herby Manchego Dressing

Ingredients:

Dressing:

1 garlic scape, sliced small

1 tablespoon finely chopped dill

1 tablespoon finely chopped parsley

1 tablespoon finely chopped chives

½ shallot, finely minced

¼ cup shredded manchego cheese

1 teaspoon dijon mustard

¼ cup red wine vinegar

½ cup olive oil

Salad:

½ head romaine, cut in ½ inch pieces

¼ head radicchio, shredded thinly

1 cup sliced baby tomatoes

1 raw ear of corn, kernels shorn from cob

½ cup roasted sunflower seeds

Directions:

Place all dressing ingredients in a small mason jar or bowl. If using jar, put top on jar and shake vigorously to incorporate ingredients. If using bowl, whisk thoroughly until all ingredients combine. Set aside.

To assemble salad place all ingredients in a large bowl. Pour amount of dressing to your liking over top and then toss very gently to coat.

Note: You will most likely have dressing left over. It will keep in fridge in an airtight container for at least a week.

Serves 4 to 6 as a side or starter.

closeupindsalad.jpg


Foraged Berry Butter Sauce

There was a day, deep, deep in January when it was probably too cold to be outside and all the vegetables were likely frostbitten and I was at the farmers’ market anyways. I believe I’ve told you about this before, but I will set the scene once again for the sake of this recipe’s story.

I was bundled up like it was the arctic, which I will maintain that New York basically is in the winter. The weary vegetables I had in my bag were few and mostly neutral in color. There were no bright reds, or deep blues, or vivid greens of summer. The sun was shining and it was bright, but only because of the reflection off the three feet of snow on the ground from the day before's storm. But still, I was there, a winter warrior.

Then I stumbled across the cozy stand that is Beth’s Farm Kitchen. Steam rose from a giant pot of soup. Grilled cheese with jam sizzled on a skillet. All of it was too enticing to pass up. So I sidled on over and tried pretty much every type of jam they had. Because, me.

Black Raspberry Jam, though, is where it all ended. The black raspberry brought me instantaneously back to mid-July summers in Connecticut.

This is where we go back even further, back to dreamy Connecticut childhood times where I would trot around barefoot (bee stings be damned) with a colander or sometimes just my hands and pick wild black raspberries and gooseberries from all over my yard. If I hadn’t eaten all of the ones I had picked, I’d bring them to my mother, who would make a simple yellow cake that she doesn’t even have a recipe written down for. Then she would take half a stick of ice cold salted butter and mash it up with a touch of sugar and the black raspberries I had brought her, just like her mother did before her. Yes, you read that right, cold butter. Stay with me.

She would then pour this berry butter sauce all over the fresh out-the-oven cake and I mean, it’s just the epitome of summer. Weird sounding it may be, a Mama Lunetta summer classic it is. It’s magical; butter just has a way of doing that to things. You will understand its sorcery when you try it, which I have to insist that you do. 

Just trust me.

Early Monday morning this past visit home, I was hurriedly packing to make the train back to the city and true to my mother’s nature, she went around the yard and picked a fresh batch of berries and tucked them into one of my bags when I wasn’t looking. I found them when I got to work and immediately knew their destiny...

berriesandpancakes.jpg

Foraged Berry Butter Sauce

Ingredients:

1 heaping cup of wild black raspberries

2 to 3 tablespoons raw sugar (or other sweetener)

4 tablespoons cold salted butter

Directions:

In a medium sized bowl, mash together the berries, sugar, and the cold butter. It’s best to use something like a pastry cutter to potato masher.

Mash until the berries have become soupy and mostly smashed and butter is dispersed throughout in very tiny chunks.

Pour over plain white cake. Or waffles. Or pancakes. But make sure to keep cold until using and then pour over something warm. That’s where the magic happens.

I haven’t ever done it with other types of berries, but this combination won’t be amiss with other components --- red raspberries or blackberries would fair well with more sugar, strawberries would be delicious, blueberries would be great.

The pancakes from the pictures are just these pancakes sans strawberries.

Makes about 1 cup of cold butter berry sauce.

pancakescutout.jpg

What I Really Eat: Roasted Rhubarb & Strawberries

"What I really eat" are my Iron Chef meals. My pantry meals. Shit, my fridge is empty meals. The things that come out of necessity and lack of time. The ingredient list will usually be small and the execution usually simple. Something that is less of a recipe and more of a guideline. If something exceptionally awesome comes out of my Sunday night scramble, it will get posted as a “What I Really Eat” and probably be accompanied with a not-my-best photo.

I can’t be the only one who found a hidden half bag of rhubarb in my crisper. I can’t be the only one who bought way too many strawberries and now have the most melty batch ever hanging out in the fridge. I can’t be the only one who thought that even though it didn’t work the first two times, that maybe, maybe this time the recipe would work.

Am I the only one? It’s okay you can tell me.

I had lofty visions. There would be whey protein! And chia seeds! And almond milk! And most importantly the essence of summer in concentrate --- drippy chunks of caramelized, roasted strawberries and rhubarb. Then I would bask in that post yoga glow, drinking summer and recovery in a glass. I tried really, really hard to make the summeriest post workout shake I could. I now have the endless amount of essentially tasteless smoothie servings stacked up in my freezer to prove how hard I tried. Unfortunately for me and my next dozen yoga sessions, it just did not work. Short of using the entire batch of roasted fruit for just one serving, the sweet, puckery strawberry-rhubarb combo just did not translate through the rest of the shake. I guess I thought the flavors would be a bit more shouty. Also, I will admit that if I was trying for shakes not of the protein variety it probably would have worked much better.

On my last attempt I was a bit defeated as I packed up yet another batch bound for the freezer. But since I had resisted in dumping the entire batch of fruit into the blender, the remainder of the day I found myself scooping up spoonfuls of the roasted fruit straight to my mouth. If anything was worth sharing other than my tale of failure, it’s this dead simple recipe for roasted strawberries and rhubarb.

Recipe is obviously a strong word. Regardless, your morning yogurt or after dinner ice cream will be the better for it. I’m feeling wistful that I didn’t think to swirl it into a baked good. It just didn’t last that long.


Roasted Rhubarb & Strawberries

Ingredients:

2 cups rhubarb diced into 1-inch pieces

2 cups strawberries halved

2 to 3 tablespoons turbinado sugar or other sweetener (feel free to add more, I like it tart)

Directions:

Heat oven to 400 degrees.

Line a sheet pan with parchment paper. Spread fruit out across paper. Sprinkle with sweetener and then give it a good toss to coat evenly.

Put in oven until juices have released and fruit is bubbly and caramelized, about 45 minutes. Check at least once, and give it a toss if desired.

Makes approximately 2 cups of roasted fruit.

Grilled Vegetables with Burrata & Pesto

In all honesty my kitchen isn’t the tiniest NYC kitchen I’ve ever seen. Technically I could probably do half a cartwheel in it. I could have a pretty good solo yoga session in it, if I ever felt the need. It is lacking quite a bit of counter space, but being a decently responsible adult I’ve been able to remedy that with the recent purchase of a shiny new stainless steel kitchen cart. I think that maybe if my boyfriend had one wish it might be that we had a bigger, deeper sink. You see, when I cook, there’s this charming little tendency I have to use every single dish/bowl/pot/pan we have in the house. But if I had a magic wand in my hand, I know what my wish would be --- a fanhood for my stove. Without one, it makes pulling out the grill pan and getting a nice sear going on some risky business.

But I took that risk of a thoroughly smoky apartment so that this dream salad could come into existence. Fresh with crispy vegetables, smoky from grilling them, herby from pesto and downright fucking sexy from burrata, this platter can do no wrong. All you people who have things like decks, and charcoal, and pools to attend to this weekend will not even have to sweat grilling up these badass veggies. And then you’re gonna top it all with burrata. Because, burrata!!

Now, I’ve waxed poetic on burrata previously. Here is yet another love letter. It’s like the best mozzarella you’ll ever eat, but better. The second it is punctured, its oozy, silky, creamy insides pour out just asking to scooped up with whatever else is on the plate for the best bite of whatever that is because, burrata. It’s not to be skipped!

Listen, I’m sorry but we’re gonna have to live with the asparagus in the pictures. Spring is obviously gone and summer has come to stay, so together we’ll have to dream of comparable summer produce to sub in instead. I think green beans are probably the answer. However, based on what I know of summer produce (which is that it is all amazing), it shouldn’t be any trouble to pick your favorite, grill it, throw it on the plate, and douse it with pesto. Nothing you pick could be bad, I’m sure of it.

Lastly, I don’t wanna say that ya shoulda made my pesto, but ya shoulda made my pesto. Recipe here! But I won’t hold it against you if you just add whatever your favorite pesto is on top of all this goodness instead.

Happy Fourth, y’all!


Grilled Vegetables with Burrata & Pesto

Ingredients:

8 ounces sugar snap peas, trimmed and stringed

1 bunch of asparagus, trimmed of woody ends (can sub 8 ounces trimmed green beans)

2 to 3 small red spring onions, sliced in thin rounds and laid out flat

olive oil

salt & pepper

8 ounces fresh burrata, removed from the water

½ cup carrot top garlic scape pesto (recipe here or other fresh pesto)

Directions:

In a large bowl toss the snap peas and asparagus with a drizzle of olive oil and season with salt and pepper.

Drizzle the laid out onions with olive oil also, and season with salt and pepper, set aside. Try not to break the rings apart.

Heat up a grill or grill pan over a medium to high heat. Once it’s been brought up to temp, add a small batch of the vegetables in one layer on the grill. Turn the vegetables only once they have developed a nice set of grill marks.  Continue in batches until all vegetables have been grilled. The vegetables should still have a nice crunch to them.

To assemble, layer the vegetables on a big serving platter. Add the burrata to the top of the vegetables and drizzle the entire dish with a touch more olive oil. Season with a touch more salt and a heavy crank of black pepper. Add a few good dollops of pesto to the dish and serve. Alternatively, you could also toss the vegetables in the pesto before layering on plate.

Serves 6 to 8

Strawberry Cornmeal Pancakes

Once upon a time I went to film school. I spent four years studying the art of filmmaking and earning a rather questionable bachelor’s degree since our studio classes took extreme precedence over our regular humanities courses. Among the cast of characters I met along the way, my production professor was definitely the most memorable in the best way.

He had an enviable handlebar mustache, an unruly mop of charcoal grey hair, and was the type to wear sunglasses at night. He had a thick eastern European accent and was a goldmine of amazing yet basically untranslatable idioms. One of his classics was not to “confuse frogs with grandmothers” followed by “it rhymes in my language”. It tended to leave the majority of our class scratching our heads as he usually applied it any situation he felt it called for. I had an affinity for his sayings that had to do with food, for now obvious reasons. He always compared filmmaking to making soup. When he wanted you to think about something or work on something a little longer he would say, “let it simmer”. When adding to the conversation, he would “add bacon to the pan” but not because he liked bacon, but because “I just like the sizzle”.

batter2.jpg

Since starting this weird food writing journey, besides a brilliant piece of editing advice (“use the axe, not the tweezers”), the line I think of most happens to be about pancakes. When we were in film school, he was essentially applying it to first drafts of the screenplays, first takes of the shoot, first editing passes of the film. But now in my second life, I am applying his advice in the most literal manner.

Here’s what you need to know, and this is some deep shit, so get ready. It can be applied literally and figuratively as I’ve already pointed out. But basically, remember when making pancakes or anything else --- that “the first pancake is always bad”.

Oh man, it’s like the truest thing anyone has ever said. Legitimately changed my life. I think of it every.single.time. I make pancakes and never feel bad when the first one is terrible. Even these. Although I do have to say, practice can make perfect. I tend to over butter the first time around which kind of deep-frys the pancake. Sounds good in theory but that’s not what makes a perfect pancake. Low heat is important; the key to pancakes is patience. If the pan is too hot, the outside and the butter will burn, but the inside will be raw. So remember --- lower heat than you think, less butter than you think, more time than you think along with the most patience. And this, the best advice of all, remember that “the first pancake is always bad”.

Now just because I have no idea how to segue into this, can I let you in on a little secret? Not only are these pancakes so seasonal, made from mostly local ingredients, quite possibly organic and totally gluten free --- they’re also birthday pancakes. June 29th was sizzle & sass kitchen’s first birthday. Since my first post, every day behind the stove, the camera, and the keyboard in the pursuit of this site has never felt more right. This project has turned into a full-on passion and there’s really nothing I’d rather do with my days. Thank you to those of you who take the time to read these posts. Here’s to many more! Let’s toast with these pancakes.


Strawberry Cornmeal Pancakes

adapted from this smitten kitchen recipe

Ingredients:

¾ cup rice flour

¾ cup fresh milled organic fine ground corn flour

½ teaspoon sea salt

½ teaspoon baking soda

½ teaspoon baking powder

1 cup buttermilk

2 tablespoons maple syrup or honey

2 eggs

3 tablespoons melted butter (plus extra for greasing griddle)

1 cup roughly chopped strawberries

Directions:

Heat oven to 200 degrees.

In a large bowl, mix rice flour, corn flour, salt, baking soda, and baking powder.

In a second bowl, whisk together buttermilk, maple syrup, and the two eggs. Lastly, whisk in the melted butter. Switch to a wooden spoon and gently stir in the strawberries.

Add the wet ingredients to the dry and using the wooden spoon, gently fold the batter until it just comes together.

Heat a skillet over low to medium heat. Melt just enough butter to lightly coat the skillet. Using a ¼ cup measure, scoop a ¼ cup of batter onto the skillet. The batter is a bit thicker and doesn’t spread as easy so I found that I needed to flatten the batter a bit into a pancake with my fingers. Let it cook on the first side for about two minutes, until golden brown and cooked through. Flip and cook until golden on the second side. Place in a 200 degree oven to keep warm, if desired. Continue with remaining batter.

Serve with whipped cream and maybe rhubarb sauce if you want to be annoyingly seasonal or plain ole’ maple syrup or overkill it with some homemade strawberry jam like I did the second these pictures were done.

Makes about 8 four-inch pancakes. If you're really awesome you could probably get 10. Serves 4 to 5.

Green Goddess Dressing

So you bought a bunch of garlic scapes. Now what?

Um, I have no idea…I’m in the same boat! Oops. It seems that garlic scapes are rarely the star of the show. I want to believe they’re okay with that, because I’ve mostly been blending them into things. A lot of suggestions for scapes are to make pesto, but I’ve already done that. I’ve read that you can pickle them and then they actually taste a bit like green beans?…Weird, right? Lest we forget last summer when I made this frittata with them and I burned the shit out of it. It was great regardless of the burning, and I made it again, not burnt, and it was still great. Maybe I should take a new photo. I also added them to a lot of veggie stir-frys. They keep really well wrapped up in the crisper. So, basically what I’m saying is, help! Any ideas for garlic scapes, send them my way! (I fully understand that I should probably be the one telling you what to do with them...see below for some of that.)

This green goddess dressing has been pinned to my Food52 collection board for awhile now and as I was desperately trying to come up with ways to use up these garlic scapes, it came to mind. I could easily swap out the garlic for some slinky green scapes. They would for sure add to the “green” in “green goddess dressing”. It also reminded me that lurking deep in the back of one of my cabinets, was a small tin of anchovies that I bought in a moment of fierce courage even though I had no plan for them yet. I felt accomplished as a I placed them in my basket, as though I had made it through a foodie rite of passage. I knew that people sing their praises as umami filled flavor boosters --- they just make everything taste better. But then they went up into a cabinet for a few months to be forgotten/avoided because I needed an excuse for another fierce moment of courage. Green Goddess dressing it was!

As a fish-phobic individual, I had my doubts of their apparent flavor magic and was convinced that upon tasting the dressing I would immediately know that anchovies were present and decide, no thank you. Opening the can, I prepared to be walloped in face by FISH. But no, that wasn’t the case. I took the little critters and quickly diced them up and threw them in with the other ingredients and they looked just like little bacon bits. They had finally met their destiny, or I guess two of them had, because shit I have a whole can of anchovies to use up...now what?

I was not brave enough to slurp up one on its own. But I think I will continue to mush them into things and pretend they’re not there, enjoying the punchiness I’m assured they lend to dishes. Take it from me, anchovy-phobes, it’s probably time. Time to use up some of those garlic scapes and those little fishies hiding in your cupboard to make this dreamy dressing.

You’ll want to dunk all of the raw vegetables in it, spread it on all of the sandwiches, possibly bathe in it and emerge like the summery goddess we are all becoming with this warm, veggie-friendly weather. I’m dreaming of tomatoes sitting in puddles of it, their insides oozing out and scooping up all that goodness with a spoon. I thought it wouldn’t be half bad as a dressing for chicken salad. Dolloped on raw baby carrots and snap peas was a pretty good start.


Green Goddess Dressing

adapted from this Food 52 recipe

Ingredients:

½ of a ripe avocado

3 tablespoons white wine vinegar

3 garlic scapes diced small

2 oil packed anchovies, finely chopped

¼ teaspoon honey

2 teaspoons fresh lemon juice

½ cup olive oil, add a bit additional if needed

¼ cup buttermilk (can sub heavy cream)

3 tablespoons chopped fresh parsley

2 tablespoons chopped fresh carrot greens

2 tablespoons chopped fresh tarragon

salt & pepper to taste

Directions:

Add avocado, vinegar, garlic scapes, anchovies, honey and lemon juice into a blender. Blitz until all is combined. Since I have a nutribullet, I added all of the olive oil at this point and blitzed until fully incorporated. If you have a regular blender, with the top on, run the blender at a low speed and slowly drizzle the olive oil in through the hole in the top. Blitz until incorporated.

Transfer this mixture to a medium sized bowl. Whisk in the buttermilk.

Whisk in the chopped herbs next. Season dressing to taste.

Best after chilled for a few hours, however let it sit for a few minutes at first for the oil to come back to its liquid state.

Makes about 1 ½ cups. Keeps for about 3 days.

Very Green Salad

Back in the dead of winter, definitely in the middle of a snowstorm, I was desperate for a few things --- inspiration, hope, and maybe some fresh greens wouldn’t hurt. After being a really diligent seasonal eater, I had reached a point where ragged and frostbitten vegetables had gotten the best of me. I remember it very specifically (Feb 21st) because I had clocked quite possibly the worst week in work history ever and even had to work on the weekend because of it. I left my office that Saturday afternoon feeling defeated and weary and a little annoyed that because of both the snowstorm and it being late in the day, I had most likely missed my weekly farmer’s market run.  (Hence the need for inspiration and hope.)

Feeling resentful I headed downtown anyways to see if maybe, just maybe, I could still catch a few stands. There was one stand that particularly stood out amongst the few remaining. It was because through its clear plastic sheath the shock of green was blatant against the white blanket of snow that had coated the square. It was too springy and green and welcoming to not step in and admire for just a moment. I lost my steely seasonal resolve in about 30 seconds.

I remember thinking --- I’m sure these little leaves are grown inside and are not truly seasonal but they are everything to me right now. The little flower that was tucked into the top of each box was the bright spot in the eye of the storm and it made the whole day, week, world okay. It doesn’t take too much to make me happy, obviously. But seriously, at that moment it was just the ticket. 

I went home and made the greenest thing I could possibly manage because I needed it to not be cold and snowing and winter and the worst week ever. And somehow this salad helped me to pretend that, yes, maybe it was actually okay, and don’t worry spring is just around the corner, the days are getting lighter, and soon the flowers will bloom and it will all be fine.

This salad has been on repeat in my lunchbox/random dinner/midnight snack rotation for weeks now. But its true season has only just appeared. The baby lettuces, crispy romaines, and soft spinach leaves are being tucked into pillowy beds in every market stand these days. It’s perfect for a late spring salad, but obviously served me well through the dreary winter weather we only just left.


Very Green Salad

Ingredients:

1 head romaine, cut into 1-inch pieces (or 8 ounces baby greens)

½ bunch lacinato kale, shredded

½ cup sunflower seeds

½ cup raw or roasted pepitas

1 cup golden raisins

1 avocado, sliced or cut up into 1-inch chunks

¼ cup shredded parmesan

juice of one lemon

good drizzle of olive oil

salt and pepper to taste

Directions:

Whisk lemon juice, olive oil, salt and pepper in a small bowl until well combined.

Add the greens and toppings to a large bowl and pour dressing over. Toss gently to coat in dressing.

Serves 4 to 6

Fried Squash Blossoms

Now I’ve been playing with these cute little yellow flowers all summer and I finally found something I felt worth posting (though simple and unassuming it might be.)

But then I put it in my back pocket since I had assumed that going into September that it was probably too late for such summery things.

But then in a brief foray to a farmer’s market on my lunch break Wednesday, I spied with my little eye squash blossoms still sitting on a table. And so I feel it it is still appropriate as chilly as these mornings and nights might be to share this with you. If anything it may now seem comforting to stand over a hot pan of oil frying these off.

It took me a bit to figure out the proper breading technique for this delicate lacy little things. My first breading, my go-to, was too heavy for them. I tried just egg wash, just parm, just almond flour. But the key here is the tapioca starch, you could even leave out the parm if you wanted, it's for flavor more than anything. The tapioca starch here gets them nice and crispy but still keeps them light as air.

Traditional recipes also stuffed them full of other things. I will experiment with that next summer, I think. But for now I leave you with the most down to earth version, a fresh tasting bud with the nicest crunch and a sprinkling salt. Practically addicting. Especially dipped in a bit of fresh sauce.

Mangia, mangia!


Fried Squash Blossoms

Ingredients:

14-16 squash blossoms

¼ cup tapioca starch

palmful of grated parmesan ( if desired)

2 eggs

¼ cup of olive oil for frying

salt

Directions:

Mix the tapioca starch and the parmesan together on a medium sized plate.

Beat your eggs in a small to medium sized bowl. Put all your squash blossoms in that same bowl and gently toss them to cover them all in egg.

Heat the oil in a medium saute pan over medium heat.

While the oil is heating up, take a few of the egg coated blossoms and one by one dip them in the tapioca-parm mix to cover completely. Gently shake off the excess and set aside for frying.

Once the oil is hot enough (you can place the end of a wooden spoon in the oil to see if it sizzles) place a few blossoms in the pan. Don’t over crowd. Fry on each side until golden brown.

Lay to drain on a paper towel covered plate. While still hot from the pan sprinkle with a touch of salt.

Continue with the rest of blossoms.

I served these with Fresh Sauce for dipping, but they’re great just plain as well.