Fresh Sauce

This is a Mama Lunetta classic, right here. Not like my pseudo mom classic of stuffed zucchini. I messed with that.

You don’t mess with the fresh sauce.

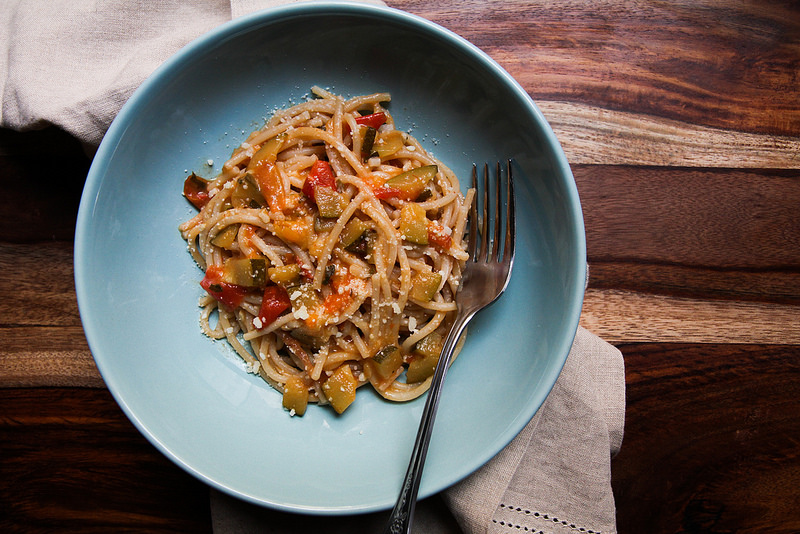
The fresh sauce is quintessentially summer for me. This sauce means my mama had so many tomatoes in the garden that we were willing to sacrifice eating them raw to melting them down into a silky, steamy sauce.

This isn’t a red sauce. This is a fresh sauce. It’s not the type you spend all day cooking and coaxing to become the most mind-blowing deliciousness you’ve ever put into your mouth. That is best left for winter. Red sauce is best left for snow. It’s summer! This is fresh sauce. From start to finish this sauce should only take around 30 minutes. You don’t wanna cook these perfect summer tomatoes to death, you want them to still taste fresh. This is how I save summer.

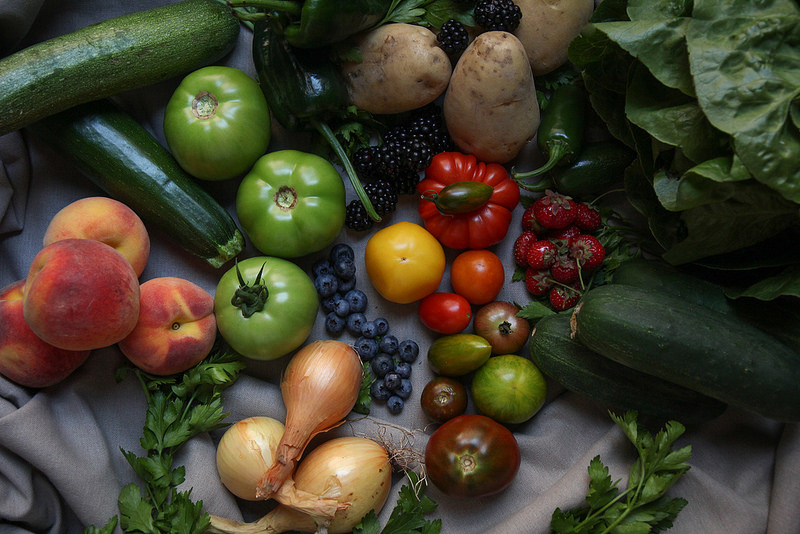
Since beginning my seasonal eating journey, I’ve really learned to appreciate and respect the seasons. And man oh man do I not want to see summer go. The berries, stone fruits, and tomatoes along with it. So in several desperate attempts to preserve it, I’ve been stuffing my freezer with berry filled treats, stone fruit compotes and crisps, and this sauce. Just so that when winter is here and seeming never-ending, I can sneak a little bit of summer out and into my kitchen.

P.s. Of course after I photographed this recipe I learned all sorts of things about tomatoes today and discovered I typically make this sauce with the “wrong” type of tomatoes. But listen, the farmer’s market totally had tomato “seconds” and they were half price. They were just a little ugly, that’s all. But they tasted wonderful. That’s all ya really need. Really good in season tomatoes. I wouldn’t try and do this with canned. Just sayin’.

So where was I, oh yes. Apparently Romas would be best. But sauce is sauce dude. August tomatoes are still August tomatoes. Use what you have. I don’t discriminate. I mean even if it’s a little watery all that means is that when you finish your bowl of whatever you dumped the sauce on, at the end there will be this lovely, soupy tablespoon or so of cheese tomato water and I mean, you totally just drink that, right? Like you put down your fork and you put the bowl to your mouth and tip back and you drink it. I won’t tell if you do, because that’s definitely, definitely what I do. Shhh….


Fresh Sauce

Ingredients:

2 pounds fresh tomatoes

4 cloves of garlic, minced

1 tablespoon grass fed butter

scant ¼ cup of grated parmesan cheese

salt and pepper to taste

Directions:

Start by bringing water to a boil in a large sauce pot.

Using a knife make a small “X” mark on the bottom of each of your tomatoes.

When the water is boiling drop your tomatoes in and watch for the skin to begin to split. This should only take 30 seconds to a minute to happen. Scoop the tomatoes out with a slotted spoon one by one as they start to split and gently place onto a flat surface to cool.

Once cool enough to handle, peel the skin of the tomatoes off. ***

Give your naked tomatoes a rough chop. They'll be super juicy! Save as much as that juice as you can to put into pot with tomatoes!

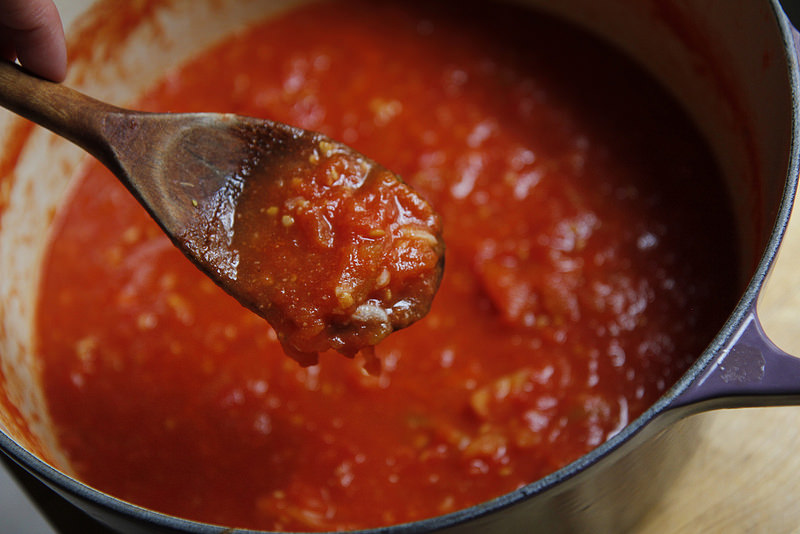
In a large sauce pot over a medium heat dump in your roughly chopped tomatoes. Create a small space in the middle of the tomatoes and dump in the minced garlic. Stir the garlic into the tomatoes. Let the sauce come to a boil then lower heat to a simmer. Stir occasionally and use the back of a wooden spoon to break up any large chunks of tomato. The sauce should take about 20 to 30 minutes to breakdown. Around 30 minutes in, add in your tablespoon of butter and ¼ cup of parmesan. Stir into sauce. Turn off heat. Taste for salt and pepper. Add as needed.

Yield: about 1 quart

***Note: I’ve totally done this lazily and not taken the skins off. You can absolutely skip this part if you wouldn’t mind the skin. Just start at the rough chop part and move on!

Roasted Strawberry Balsamic Glaze

 There was a point this summer where I was up to my damn eyeballs in strawberries.

My mother and I went strawberry picking at a local farm in Connecticut and we picked 30 pounds of berries. 30 POUNDS! Oops! 

We made a ton of jam, we made loads of shortcake, and we gave a bunch away to friends. And we still had strawberries.

The thing with strawberries though is, they last all of two seconds, and then they start to wither and wrinkle and generally mold over. Especially the kind you freshly pick. They’re just not built to withstand cross country shipping like their sturdier grocery store counterparts.

So we had to start thinking of creative ways to use them.

This recipe is one I came up with that weekend I was buried in berries.

It’s an interesting thing cooking with the seasons. I was sad since I didn’t have my shit together enough in June to get many strawberry recipes in and up on this here blog thing. But, I’m posting it now, since I’ve realized that you can still get strawberries locally here and there at the markets. Even if they’re suspicious ones.

This glaze is ridiculously easy to do, I feel bad even calling it a recipe. But my mother and a friend could not get over how much they enjoyed it.

Please don’t judge me and my lack of steak cooking skills. I’m not big on the whole “rare” steak thing and I’m sure this is a touch overcooked for many steak connoisseurs. None the less, this glaze was tasty and that’s what I’m really selling here. So cook those steaks (or chicken, or pork or whatever!) to perfection and then smother it in this sauce. I hope you won’t be disappointed. We definitely weren’t.


Roasted Strawberry Balsamic Glaze

Ingredients:

1 cup strawberries, halved

1 cup balsamic vinegar

Directions:

Heat oven to 350 degrees.

Place vinegar in a small saucepan and bring to a boil. Reduce heat to low and let vinegar reduce by half, until thick and syrupy. About 30 to 40 minutes.

While vinegar is reducing, spread out the halved strawberries on a sheet pan. Roast at 350 until soft and juicy. Approximately 20 to 30 minutes.

Transfer your cooked berries to a bowl and then either mash them well with a fork or for a super smooth sauce ---- use a blender, food processor, or an emulsifier.

Depending on the timing, your balsamic vinegar should be reduced by now.

Take off the heat and pour into a serving bowl if you wish or just leave in pan. Take your berry sauce and mix into vinegar reduction.

Use as a glaze for any meat. I used it with steak!

Yield: approximately 1 cup of sauce

Butter and Dill Carrots

Every summer I get to spend a long weekend in the beautiful state of Maine visiting family. It’s the kind of place where there’s a mile between all the houses and you don’t hear anything but sounds of nature all day long. They live in the dead middle of the state and their house is surrounded by nothing but trees and open skies.

My cousin Evelyn cultivates a huge, beautiful garden. This year’s bean stalks were taller than me and there were tomatoes for days.

Late one morning she harvested a few pounds of baby carrots and barely ten minutes later they were simmering on the stove top destined for lunch.

What she served us was so simple and also just so good. The combination of flavors was something I’ve never encountered before. It felt both fresh and rich at the same time. It was so different from anything I've ever had that I asked for permission to share it on here.

The dill and carrots pictured are her gorgeous produce. I mean look at those cute little "tails"!


Butter and Dill Carrots

Evelyn’s Recipe

Ingredients

1 pound fresh carrots, cleaned and trimmed of their tops - ideally the type just recently yanked out of the ground, and on the smaller side if possible. Halve or quarter bigger carrots so they cook through equally

1 tablespoon grass fed butter

1 heaping tablespoon chopped fresh dill

salt to taste

Directions

Bring water to a boil in a 1 quart sauce pot.

Once the water is boiling drop in your carrots. Cook them until just fork tender, about 6 to 7 minutes. This could take longer depending on the size of your carrots.

Strain the water from the carrots and place in serving bowl. While the carrots are still warm stir in butter and dill until the butter has melted and the dill has evenly distributed.

Salt to taste and serve.

Serves 4 as a side

Slightly Spicy Slaw

So I went to Whole Foods one day after the green market for cat food although I was super hungry and me and grocery shopping while hungry never ends in a good way. Believe me, I could’ve made it home for food. Really. But I snuck past the food bar and of course lost my resolve. Now, mistake? Or kismet? I’ve decided on definitely meant to be because I stumbled across something that I’ve probably thought about once a day since. It was called “Firecracker Slaw.” If there’s one thing I adore in life, it’s slaw. I’m that gross person who always eats the tiny cup of half warm coleslaw sent along with that pickle at the diner. As of recently I’ve also started to gravitate towards more vinegar-based dressings and have discovered a whole new world of slaw making.

This Firecracker Slaw was the stuff of my dreams. Not sure if anybody’s noticing a pattern going on, but I like things spicy around here. It was beautifully colored - the red of the cabbage, there were red, yellow and orange bell peppers thrown in, and there they were, slivers of jalapeno. My recreation does not taste exactly like the wholefoods version, but it’s close and it’s GOOD.

Hey, little side note, you’ll notice there’s something called kohlrabi in this. Kohlrabi? Kohlrabi anyone? I received three kohlrabi in my farmshare and was like….what the f….are these?? Since learning more about them, they’ve all gone into slaws and I couldn’t of been more pleased. If you don’t have any kohlrabi lying around or haven’t a clue what it even is (been there girl) just sub in a ½ head of green cabbage instead. Kohlrabi are in the same family as cabbage and broccoli.

14694186409_844c85a898_c.jpg

Hmmm…..broccoli slaw….


Slightly Spicy Slaw

inspired by Whole Foods’ “Firecracker Slaw”

Ingredients:

Slaw

½ head of red cabbage, cored and sliced into long thin strips

1 bell pepper, orange, yellow, or red for color, sliced into long thin strips

½ cucumber, sliced into matchsticks

½ red onion, sliced thinly

1 kohlrabi, peeled and shredded

3 carrots, shredded

1 jalapeno pepper, de-ribbed and de-seeded (or leave in for more heat), sliced into super thin matchsticks

Dressing

3 tablespoons olive oil

1 ½ tablespoons Red wine vinegar

1 tablespoon dijon mustard

2 teaspoons honey

salt and pepper to taste

Directions:

Take all your prepped vegetables and toss them together in a large bowl.

Combine dressing ingredients together in a small bowl and then pour over your slaw. Toss slaw again to distribute dressing.

You can eat it right away, but I always find slaw better when it’s sat a bit and had time to meld it’s flavors and wilt a little.

Kale, Garlic scape, and Feta Frittata

Wait! Don’t go! 

I know that is the most burnt, unappealing looking frittata ever but don’t lose hope in me yet! I’m just easily distracted.

Here’s what you’re gonna do when you make this --- you’re gonna take it out about 5 mins earlier than I did, and you won’t be disappointed. As a general rule, it’s a good idea to keep an eye on anything that’s under the broiler. Noob move here. What I wouldn’t give to have a window in my oven door. But seriously, underneath that blackened exterior was the most luscious, well flavored eggy concotion I’ve ever thrown together.

I mean the moment I saw I had burnt the thing beyond saving, I was like, well there goes posting that. But I was also half starved and needed lunch, so I decided to see if it was still edible. And my goodness, yes it was! The flavor! The yum! The ahhh - I have to tell everyone about this! Screw the top!

So are garlic scapes still a thing? Real talk, I made this frittata a bit ago when I had a pound of them from my farm share.  I’m not so sure they are still available but if they are, find ‘em and do it! My CSA gave me so many that they went into EVERYTHING and it was the best. Assuming they are long gone from farmstand, garlic would be just fine here, I’d say 1 clove minced should do the trick

Obviously I could have redone this attempt. But sometimes there’s something endearing about a total screw up...yea? Life’s beauty is in the imperfections, right????

(I’m just tryin’ to make myself feel better about burning my frittata.)

14835250212_323dab0cef_c.jpg

Kale, garlic scape, and feta frittata

Ingredients:

2 tablespoons butter (or other cooking fat)

1 bunch kale, destemmed and torn into bite size pieces (I used lacinato)

½ medium size onion, sliced

3 garlic scapes, diced (or 1 clove of garlic minced)

pinch of red pepper flake (if desired)

6 eggs beaten

½ cup grassfed heavy cream

salt & pepper

⅓ cup feta cheese

sprinkle of shredded pecorino or parmesan (optional)

Directions:

Heat 1 tablespoon of butter in a 10-inch cast iron skillet over medium heat. Once melted, add kale, onion, garlic scapes, and red pepper flake to pan. Cook until onions are transculent and kale is soft and wilted.

While veggies are cooking down, beat 6 eggs with heavy cream, salt and pepper. Once fully beaten, stir feta in.

Add in second tablespoon of butter and allow to melt into vegetables. Pour eggs over the sauteed vegetables and stir in quickly to incorporate. Now leave to set over medium heat for approximately 10 minutes. Turn on your broiler. Right before placing under broiler sprinkle a bit of shredded pecorino or parmesan, if desired. Broil for approximately 10 minutes, but keep a watchful eye, remove once top of frittata is puffy and becomes a delightful golden brown.

Fresh Pea Deviled Eggs and a few excuses...

Oops. Hello, hi, I know…it’s been too long.

Yes? What was that? Sorry I can barely hear you over my own self doubting and guilty thoughts about not keeping up with this the way I wanted to.

Okay. Off to make a real go at it, starting……...now!

So, after many, many a weekend of not being in the comforts of my own kitchen, I’m hoping to get back on track here. Two of these past weekends were spent at my mother’s in CT. So while I couldn’t do my usual farmer’s market runs, I did spend the days weeding the garden, making flower bouquets, and picking wild raspberries from around the yard.

Can’t get more local than that, really. I know, woe is me.

Then, I spent this past weekend eating my way through Austin, Texas. See what did I tell you, full of excuses. I was visiting friends but mainly I stuffed my face with naughty, naughty (utterly delicious) food.

Of course, me, being who I am, I managed to come upon a farmer’s market, and somehow restrained myself from buying all the peaches and fresh tomatoes I saw. It was hard. Austin was full of friends, puppies, tacos, and hot Texas sun and I’m already missing it - but I’m also looking forward to my first free weekend in my city of New York in a while. Back to the market and back in the kitchen I go! I can’t wait, I have truly missed it.

In other more relevant news --- at one point I did get around to using some of my shelling peas from my CSA and have the pictures to prove it!

14537427701_5146d3a2a1_z.jpg

I was inspired by smitten kitchen’s spring asparagus version of these deviled eggs and when she suggested using peas instead, I made a mental note to do so. They were the first thing I thought of when I got them in my farmshare last week.

14560931023_f515b7a7db_z.jpg

The eggs in the pictures look super green because I used mashed avocado instead of mayo, but mine went brown pretty darn fast. I would use mayo next time instead which is what the recipe below reflects.

These eggs had a lovely pop of freshness in an otherwise usually rich bite. Can’t wait to make them again with mayonnaise instead. Although, let me say, the avocado didn’t taste bad whatsoever, so if you’re anti-mayo it’s still a tasty choice. They just go from beautifully green to disgustingly brown in about 5 seconds, so eat them up fast!

14539851682_8083366cf6_z.jpg

Fresh Pea Deviled Eggs

inspired by these eggs over at smitten kitchen

Ingredients

4 hard boiled eggs

3 tablespoons fresh peas - shelled, blanched, and smashed or pureed

2 tablespoons mayonnaise (I use Sir Kensington’s)*

Squeeze of half a lemon ( approx 1 tablespoon juice)

½ tsp dijon mustard

salt and pepper to taste

*(If going the avocado route - use 2 tablespoons of avocado that has been mashed with a bit of fresh lemon juice)

Slice your hard boiled eggs in half and place the yolks in a bowl and set the whites aside.

(P.s. this is how I’ve been hard boiling my eggs with terrific results.)

Take your smashed peas, mayo, lemon juice, mustard and put them in the same bowl as the yolks and mash together to incorporate. Stir in your salt and pepper to taste.

Once fully mixed together, scoop yolk mixture and spread out equally among the egg whites. Serve immediately (recommended if you use avocado) or refrigerate covered in plastic wrap until ready to eat.

Last note, I fully recommend reading through the entirety of the smitten kitchen asparagus recipe from above. She has so many tricks and tips up her sleeve that are super helpful for making just the prettiest deviled eggs there could be.

Pickled Red Onions

Is it too late for an easy, quick Fourth of July condiment recipe? I know it’s practically over, but due to the East Coast’s complete wash out of a Fourth, perhaps some of y’all will be celebrating tomorrow? That’s what we’re doing and I will be sharing this love then. On all the burgers and all the hotdogs. Bunless, they might be. Tasteless, not so. 

As previously mentioned yesterday. I had time to do no things this week. I am le worst. So all those lovely veggies I lugged home from the market last Saturday have yet to meet their true destiny as the picnic salads I had planned to get done pre-July 4th. Gah! Even if you did celebrate today, this quick topping will hopefully elevate that cold burger you sneak out of the fridge at midnight.

I’ve only suddenly, recently, begun to adore red onions. With foods and me, it’s like a switch. One day I will hate something particular, the next day -- oh hey! You like this now! It happened with pickles, hot dogs, olives, AVOCADOS! For the life of me I can’t believe I went so long not eating avocados. I’ve thoroughly made up for lost time with those, let me tell you. It’s interesting how our palates change. So now, all of a sudden, like two weeks ago, I’ve been like -- I want all the red onions! Put them in all the salads, burrito bowls, on top the burgs!!! Charred or raw, doesn’t matter. I don’t know what hit me. So after inhaling a burger at a local restaurant that had a pickled red onion relish on it, the next logical thing to do was figure out how to pickle them at home.  

They're terribly easy to make, and definitely worth it. This is an all summer recipe really (maybe even all year), and I plan to have a jar of them on hand indefinitely.

Pickled Red Onions

1/4 cup white wine vinegar

1 tablespoon honey

1 teaspoon salt

1 tsp whole peppercorns

1 1/2 cup water

1/2 red onion, sliced

In a small saucepan, bring vinegar, honey, salt, peppercorns, and water to a boil. Add in the sliced red onion and reduce heat to a simmer. Simmer for 3-5 mins, then remove from heat and let cool.

Place in a sealed container. They will last for about two weeks in the fridge.

Put on everything. 


Strawberry Rhubarb Compote

This week got completely away from me. Completely. I got home from work late every night with not much more time to make anything but an egg and go straight to bed. Thus, my gorgeous last of the season strawberries had begun to wither away! This is not how I wanted to start this whole thing off. This whole blogging thing. It’ll be easy, I said. No problem, I said.

 Reality check. 

So to save my poor, poor, shriveling berries, tonight I chopped them up and threw them into a saucepan with some diced rhubarb I’d frozen. I cooked them away with some lemon zest and juice, some honey and vanilla. This all resulted in a decently respectable strawberry rhubarb compote. Schmear it on something toasty or drizzle it over ice cream, it’s good for all those things.

Strawberry Rhubarb Compote

2 cups extra ripe strawberries, chopped

1 cup rhubarb, chopped

Zest and juice of ½ a lemon

Splash of vanilla

4 tablespoons of honey

 Mix all indredients in a small saucepan over a low heat, stirring occasionally until broken down and thickly jammy. Seriously. That's it. I’d say it took mine about 40mins to get to my desired consistency.

It should last about two weeks in the refrigerator.